

Ever since I started this blog, I wanted to write an article about my favorite video editing apps on Android but I could never decide on how to go about it, whether to write a separate in-depth article on each of them, a really long one on all of them or a more condensed one without too much detail or workflow explanations, more of an overview. So I recently figured there’s been enough pondering on this subject and I should just start writing something. The very basic common ground for all these mobile video editing apps mentioned here is that they allow you to combine multiple video clips into a timeline and arrange them in a desired order. Some might question the validity of editing video on such a relatively small screen as that of a smartphone (even though screen sizes have increased drastically over the last years). While it’s true that there definitely are limitations and I probably wouldn’t consider editing a feature-length movie that way, there’s also an undeniable fascination about the fact that it’s actually doable and can also be a lot of fun. I would even dare to say that it’s a charming throwback to the days before digital non-linear editing when the process of cutting and splicing actual film strips had a very tactile nature to it. But let’s get started…
LumaFusion


LumaFusion started out on Apple’s iOS in 2016 and has long been the cause of great envy among Android users interested in editing video on their devices. Particularly on an iPad, the app is a pleasure to use and full of pro tools and advanced features. For quite a while the dev team was sceptical about the idea of bringing the app to such a diverse platform as Android but in October 2021, LumaTouch, the makers of LumaFusion, eventually announced that an Android/ChromeOS version is in the works. One year later, LumaFusion popped up in the Google PlayStore – it’s still labeled an „early access beta“ but let me tell you, it’s absolutely worth the money! LumaFusion is – hands down – the most advanced mobile video editing app out there – and for many, it will also be the best! I say „many“ instead of „everyone“ because depending on the complexity of your project and the device you are using, KineMaster or VN might also rank very highly in this regard. If you have a small, simple project and want to edit on your phone, I might still prefer KineMaster because its UI better fits smaller screens with its touch-friendly layout. Other than that, LumaFusion is a must-have!
I don’t really want to go into much detail here as the app (almost) has everything you need for mobile pro video editing. Sure, if you compare it to a full-blown desktop editor, you might still miss a thing or two but some of it (like multi-cam editing) is already on the horizon. That being said, being on the Android platform, you do have to consider what device you are using it on, both in terms of OS version (it needs at least Android 10) and your device’s chipset (no specifics but you won’t be editing multiple 4K tracks on a cheap entry-level handset). But I have found that even on more affordable and mid-range devices, it’s already very solid. Still, if you’re in for a new phone/tablet and know that you’ll be doing some heavy video editing, go look at least for mid-range or even better flagship level with a fairly powerful chipset, for instance with a fairly recent Snapdragon 8, 800 or 700-series SoC. The only problem regarding powerful Android tablets is that the options are still rather limited, with Samsung’s Tab S-series usually being the silverback gorilla. I personally own a Xiaomi Pad 5 with a Snapdragon 860 though and LumaFusion works really well on it.
KineMaster

When I got my first smartphone in 2013 and started looking for video editing apps in the Google PlayStore, I ran into a lot of frustration. There was a plethora of video editing apps but almost none of them could do more than manipulate a single clip. Then, in late December, an app called KineMaster was released and just by looking at the screenshots of the UI I could tell that this was the game changer I had been waiting for, a mobile video editing app that actually aspired to give you the proper feature set of a (basic) desktop video editing software. Unlike some other (failed) attempts in that respect, the devs behind KineMaster realized that giving the user more advanced editing tools could become an unpleasant boomerang flying in their face if the controls weren’t touch-friendly on a small screen. If you ever had the questionable pleasure of using a video editing app called “Clesh” on Android (it’s long gone), you know what I’m talking about. To this date, I still think that KineMaster has one of the most beautiful and intuitive UIs of any mobile app. It really speaks to its ingenuity that despite the fact that the app has grown into a respectable mobile video editing power house with many pro features, even total editing novices usually have no problem getting the hang of the basics within a couple of hours or even minutes.

While spearheading the mobile video editing revolution on Android, KineMaster dared to become one of the first major apps to drop the one-off payment method and pioneer a subscription model. I had initially paid 2€ one-off for the pro version of the app to get rid of the watermark, now you had to pay 2 or 3€ a month (!). I know, “devs gotta eat”, and I’m all for paying a decent amount for good apps but this was quite a shock I have to admit. It needs to be pointed out that KineMaster is actually free to download with all its features (so you can test it fully and with no time limit before investing any money) – but you always get a KineMaster watermark in your exported video and the export resolution doesn’t include UHD/4K. If you are just doing home movies for your family, that might be fine but if you do stuff in a professional or even just more ambitious environment, you probably want to get rid of the watermark. Years later, with every other app having jumped on the subscription bandwagon, I do feel that KineMaster is still one of the apps that are really worth it. I already praised the UI/UX, so here are some of the important features: You get multiple video tracks (resolution and number are device-dependend) and other media layers (including support for png images with tranparency), support for multiple frame rates including PAL (25/50), the ability to select between a wide variety of popular aspect ratios for projects (16:9, 9:16, 1:1, 2.35:1 etc.) and even duplicate the project with a different aspect ratio later (very useful if you want to share a video on multiple platforms), there’s the option to archive projects via a .kine-file, you can use keyframes to animate content, have a very good title tool at hand, audio ducking, voice over recording, basic grading tools and last but not least: the Asset Store. That’s the place where you can download all kinds of helpful assets for your edit: music, fonts, transitions, effects and most of all (animated) graphics (‘stickers’) that you can easily integrate into your project and make it pop without having to spend much time on creating stuff from scratch. Depending on what you are doing, this can be a massive help! I also have to say that despite Android’s fragmentation with all its different phones and chipsets, KineMaster works astonishingly well across the board.
There are still things that could be improved (certain parts of the timeline editing process, media management, precise font sizes, audio waveforms for video clips, quick audio fades etc.) and development progress in the last one or two years seems to have slowed down but it remains a/the top contender for the Android video editing crown, although way more challenged than in the past. Last note: KineMaster has recently released beta versions of two “helper” apps: VideoStabilizer for KineMaster and SpeedRamp for KineMaster. I personally wish they would have integrated this functionality into the main app but it’s definitely better than not having it at all.
PowerDirector

The first proper rival for KineMaster emerged about half a year later in June 2014 with Cyberlink’s PowerDirector. Unlike KineMaster, PowerDirector was already an established name in the video editing world, at least on the consumer/prosumer level. In many ways, PowerDirector has a somewhat (yet not completely) equal feature set to that of KineMaster with one key missing option being that for exporting in PAL frame rates (if you don’t need to export in 25/50fps, you can ignore this shortcoming). The UI is also good and pretty easy to learn. After KineMaster switched to the subscription model, PowerDirector did have one big factor in its favor: You could still get the full, watermark-free version of the app by making a single, quite reasonable payment, I think it was about 5€. That, however, changed eventually and PowerDirector joined the ranks of apps that you couldn’t own anymore, but only rent via a subscription to have access to all features and watermark-free export. Despite the fact that it’s slightly more expensive than KineMaster now, it’s still a viable and potent mobile video editor with some tricks up its sleeve.

It was for instance – until recently – the only mobile video editor that has an integrated stabilization tool to tackle shaky footage. It’s also the only one with a dedicated de-noise feature for audio and unlike with KineMaster you can mix your audio levels by track in addition to just by individual clips. Furthermore, PowerDirector offers the ability to transfer projects from mobile to its desktop version via the Cyberlink Cloud which can come in handy if you want to assemble a rough cut on the phone but do more in-depth work on a bigger screen with mouse control. Something rather annoying is the way in which the app tries to nudge or dare I say shove you towards a subscription. As I had bought the app before the introduction of the subscription model, I can still use all of its features and export without a watermark but before getting to the edit workspace, the app bombards you with full-screen ads for its subscription service every single time – I really hate that. One last thing: There are a couple of special Android devices on which PowerDirector takes mobile video editing actually to another level but that’s for a future article so stay tuned.
Adobe Premiere Rush

Even more so than Cyberlink, Adobe is a well-known name in the video editing business thanks to Premiere Pro (Windows/macOS). More than once I had asked myself why such a big player had missed the opportunity to get into the mobile editing game. Sure, they dipped their toes into the waters with Premiere Clip but after a mildly promising launch, the app’s development stagnated all too soon and was abandoned eventually – not that much of a loss as it was pretty basic. In 2018 however, Adobe bounced back onto the scene with a completely new app, Premiere Rush. This time, it looked like the video editing giant was ready to take the mobile platform seriously.
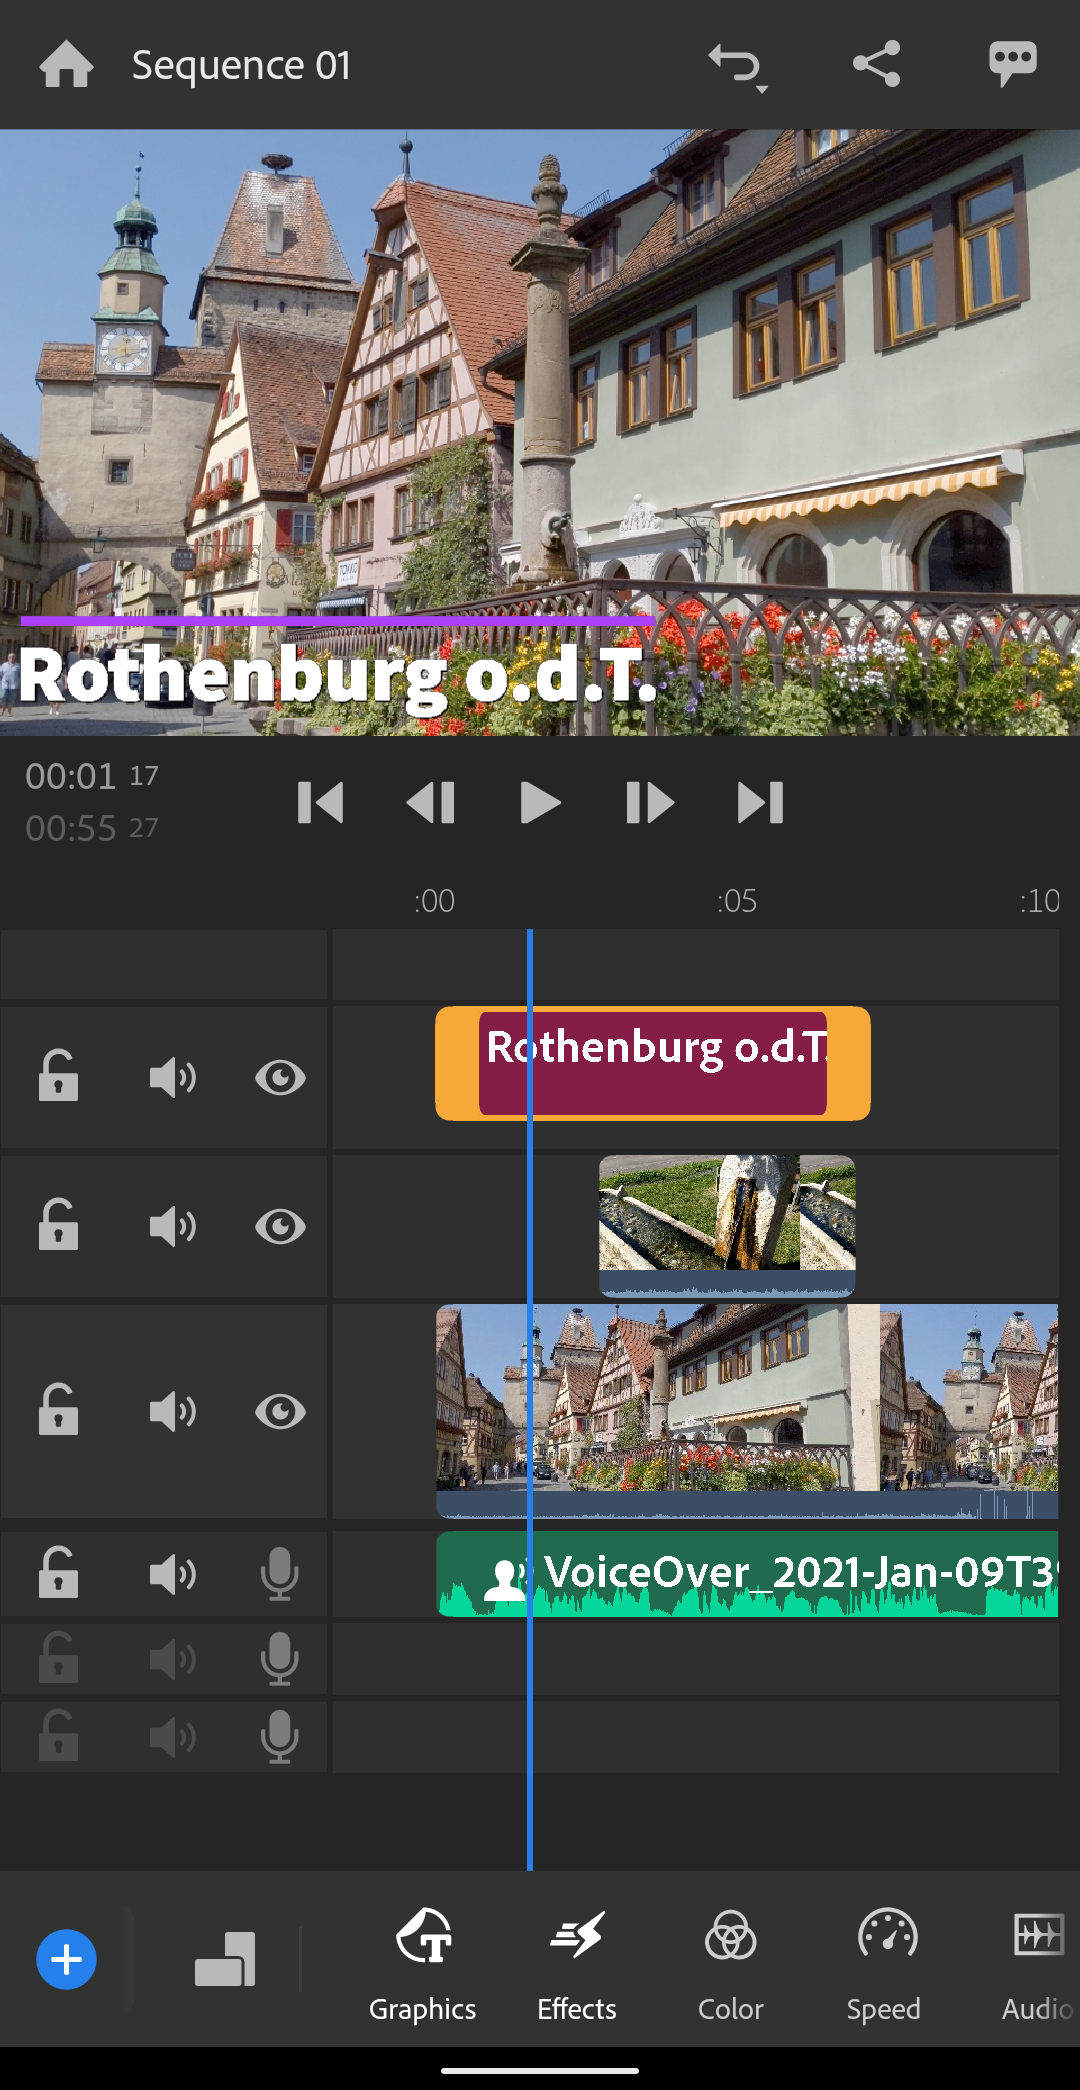
The app has a very solid set of advanced editing features and even some specialties that are quite unique/rare in the mobile editing environment: You can for instance expand the audio of a video clip without actually detaching it and risking to go out of sync, very useful for J & L cuts. There’s also a dedicated button that activates multi-select for clips in the timeline, another great feature. What’s more, Rush has true timeline tracks for video. What do I mean by “true”? KineMaster and PowerDirector support video layers but you can’t just move a clip from the primary track to an upper/lower layer track and vice versa which isn’t that much of a problem most of the time but sometimes it can be a nuisance. In Rush you can move your video clips up and down the tracks effortlessly. The “true tracks” also means that you can easily disable/mute/lock a particular track and all the clips that are part of it. One of Rush’s marketed highlights is the auto-conform feature which is supposed to automatically adapt your edit to other aspect ratios using AI to frame the image in the (hopefully) best way. So for instance if you have a classic 16:9 edit, you can use this to get a 1:1 video for Instagram. This feature is reserved for premium subscribers but you can still manually alter the aspect ratio of your project in the free version. For a couple of months, the app was only available for iOS but premiered (pardon the pun!) on Android in May 2019. Like PowerDirector, you can use Adobe’s cloud to transfer project files to the desktop version of Rush (or even import into Premiere Pro) which is useful if the work is a bit more complex. It’s also possible to have projects automatically sync to the cloud (subscriber feature). Initially, the app had a very expensive subscription of around 10€ per month (and only three free exports to test) unless you were already an Adobe Creative Cloud subscriber in which case you got it for free), but it has now become more affordable (4.89€ monthly or 33.99 per year) and the basic version with most features including 1080p export (UHD/4K is a premium feature) is free and doesn’t even force a watermark on your footage – you do need to create a (free) account with Adobe though.
The app does have its quirks – how much of it are still teething aches, I’m not sure. In my personal tests with a Google Pixel 3 and a Pocophone F1, export times were sometimes outrageously long, even for short 1080p projects. Both my test devices were powered by a Snapdragon 845 SoC which is a bit older but was a top flagship processor not too long ago and should easily handle 1080p video. Other editing apps didn’t have any problems rushing out (there goes another pun!) the same project on the same devices. This leads me to believe that the app’s export engine still needs some fine tuning and optimization. But maybe things are looking better on newer and even more powerful devices. Another head-scratcher was frame rate fidelity. While the export window gave me a “1080p Match Framerate” option as an alternative to “1080p 30fps”, surely indicating that it would keep the frame rate of the used clips, working with 25fps footage regularly resulted in a 30fps export. The biggest caveat with Rush though is that its availability on Android is VERY limited. If you have a recent flagship phone from Samsung, Google, Sony or OnePlus, you’re invited, otherwise you are out of luck – for the moment at least. For a complete list of currently supported Android devices check here.
VN

Ever since I started checking the Google PlayStore for interesting new apps on a regular basis, it rarely happens that I find a brilliant one that’s already been out for a very long time. It does happen on very rare occasions however and VN is the perfect case in point. VN had already been available for Android for almost two years (the PlayStore lists May 2018 as the release date) when it eventually popped up on my radar in March 2020 while doing a routine search for “video editors” on the PlayStore. VN is a very powerful video editor with a robust set of advanced tools and a UI that is both clean, intuitive and easy to grasp. You get a multi-layer timeline, support for different aspect ratios including 16:9, 9:16, 1:1, 21:9, voice over recording, transparency with png graphics, keyframing for graphical objects (not audio though, but there’s the option for a quick fade in/out), basic exposure/color correction, a solid title tool, export options for resolutions up to UHD/4K, frame rate (including PAL frame rates) and bitrate.
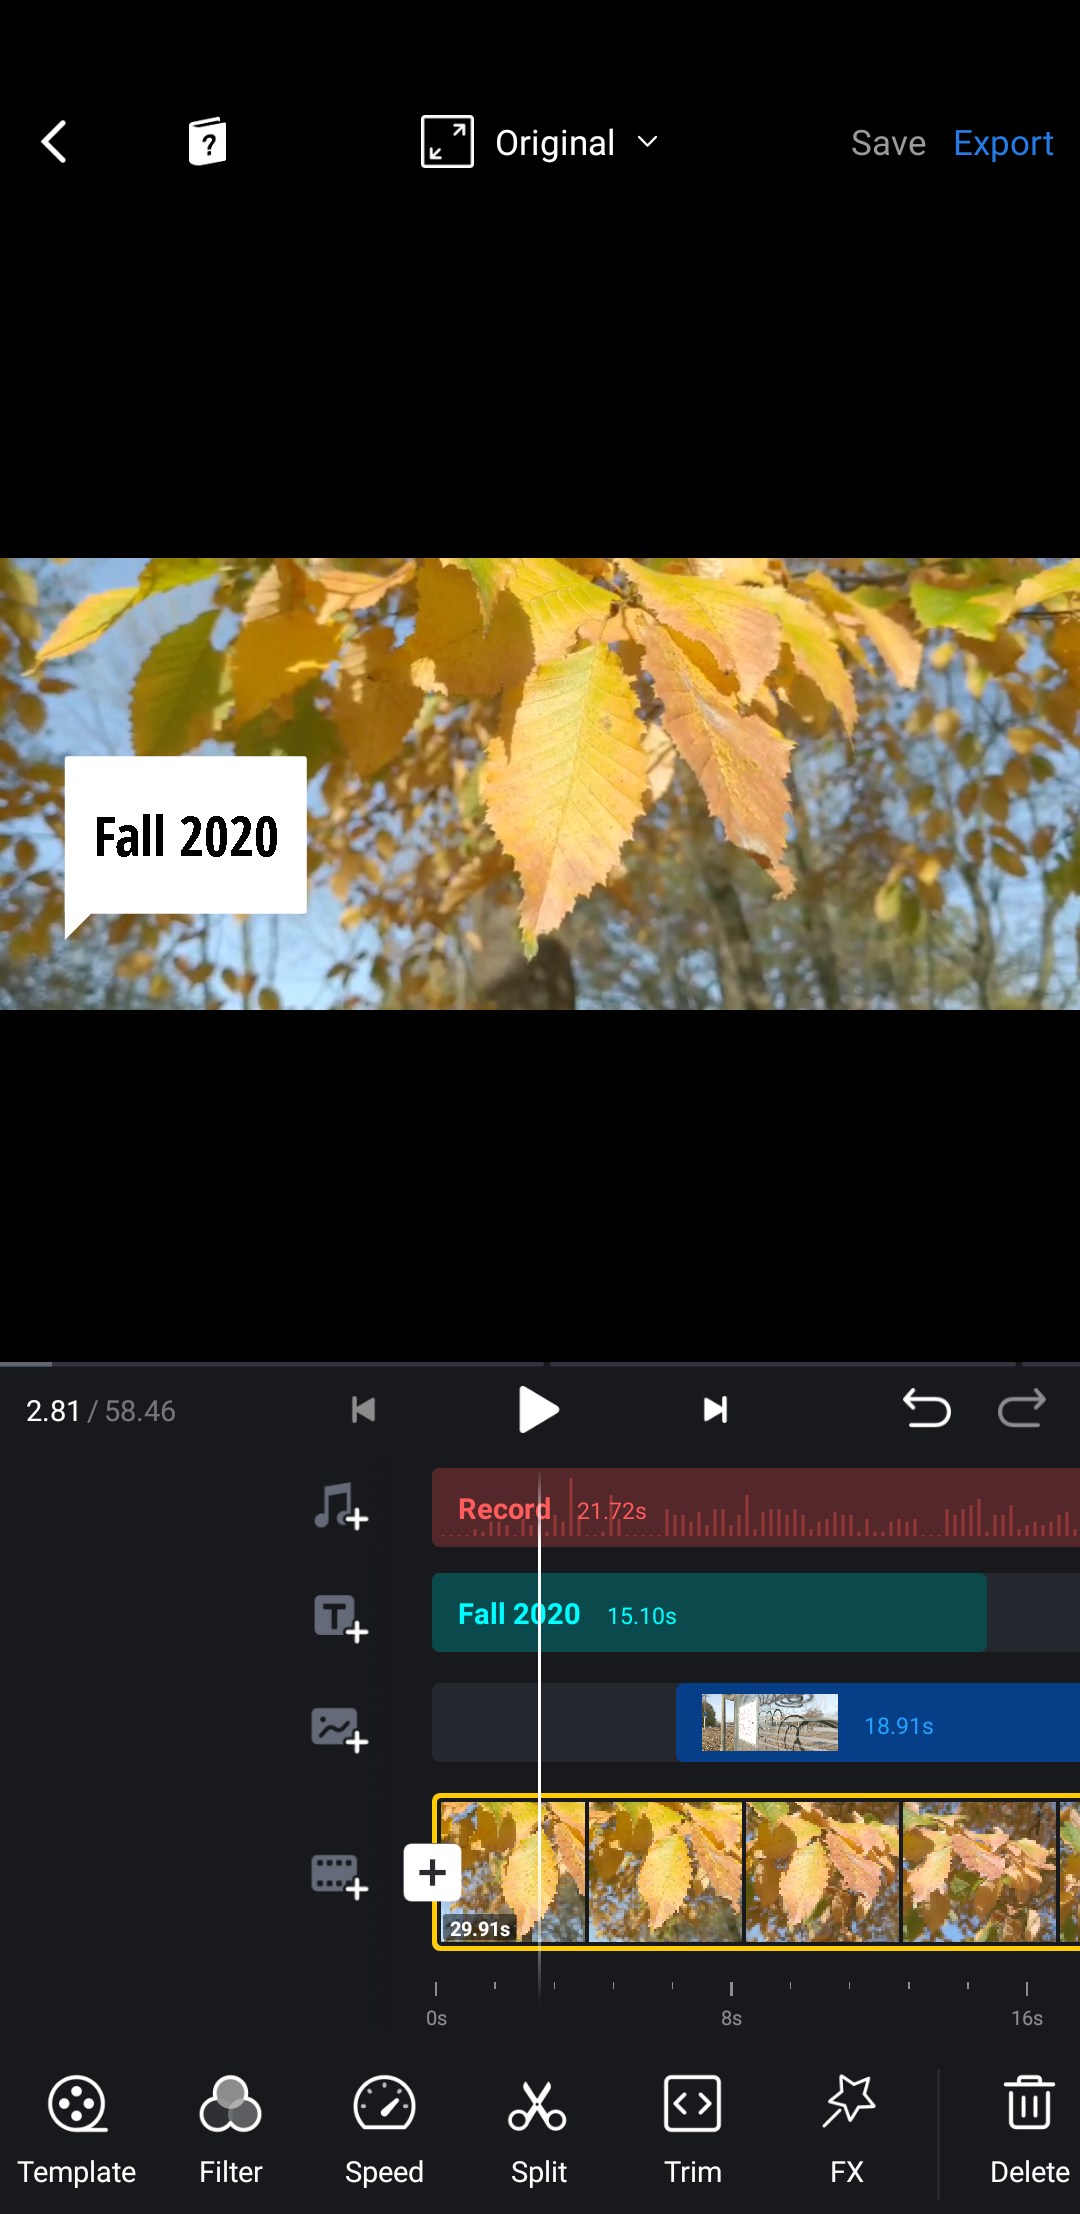
In other news, VN is currently the only of the advanced mobile video editing apps with a dedicated and very easy-to-use speed-ramping tool which can be helpful when manipulating a clip in terms of playback speed. It’s also great that you can move video clips up and down the tracks although it’s not as intuitive as Adobe Premiere Rush in that respect since you can’t just drag & drop but have to use the “Forward/Backward” button. But once you know how to do it, it’s very easy. While other apps might have a feature or two more, VN has a massive advantage: It’s completely free, no one-off payment, no subscription, no watermark. You do have to watch a 5 second full-screen ad when launching the app and delete a “Directed by” bumper clip from every project’s timeline, but it’s really not much of a bother in my opinion. In the past you had to create an account with VN but it’s not a requirement anymore. Will it stay free? When I talked to VN on Twitter some time ago, they told me that the app as such is supposed to remain free of charge but that they might at some point introduce certain premium features or content. VN recently launched a desktop version for macOS (no Windows yet) and the ability to transfer project files between iOS and macOS. While this is currently only possible within the Apple ecosystem (and does require that you register an account with VN), more cross-platform integration could be on the horizon. All in all, VN is an absolutely awesome and easily accessible mobile video editor widely available for most Android devices (Android 5.0 & up) – but do keep in mind that depending on the power of your phone’s chipset, the number of video layers and the supported editing/exporting resolution can vary.
CapCut


CapCut is somewhat similar to VN in terms of basic functionality (multiple video tracks, support for different frame rates including PAL, variety of aspect ratios etc.) and layout, but with a few additional nifty features that might come in handy depending on the use case. Like VN, it’s completely free without a watermark and you don’t have to create an account. CapCut was – following Cyberlink’s PowerDirector – the second advanced mobile video editing app to introduce a stabilization tool and it can even be adjusted to some degree.
Its unique standout double-feature however has to do with automatic speech-to-text/text-to-speech processing. As we all know, captions have become an integral part of video production for social media platforms as many or most of us browse their network feeds without having the sound turned on and so captions can be a way to motivate users to watch a video even when it’s muted. While it’s no problem to manually create captions with the title tool in basically any video editing app, this can be very time-consuming and fiddly on a mobile device. So how about auto-generated captions? CapCut has you covered. It doesn’t work perfectly (you sometimes have to do some manual editing) and it’s currently only available in English, but it’s definitely a very cool feature that none of the other editors mentioned here can muster. Interestingly, it’s also possible to do it the other way around: You can let the app auto-generate a voice-over from a text layer. There are three different voices available: “American Male”, “American Female” and “British Female” (only English again). This can be useful if you quickly need to create a voice-over on the go and there’s no time or quiet place to do so or if you are not comfortable recording voice-overs with your own voice. Any cons? Generally, I would say that I prefer VN of the two because I like the design and UX of the timeline workspace better, it’s easier to navigate around, but that’s probably personal taste. What is an actual shortcoming however if you are after the highest possible quality is the fact that CapCut lacks support for UHD/4K export. Don’t get me wrong, you can import UHD/4K footage into the app and work with it but the export resolution is limited to 1080p and you also can’t adjust the bitrate. From a different angle, it should also be mentioned that CapCut is owned by Bytedance, the company behind the popular social video platform TikTok. While you don’t have to create an account for CapCut, you do have to agree to their T&Cs to use the app. So if you are very picky about who gets your data and kept your fingers off TikTok for that reason, you might want to take this into consideration.
Videoleap

The app has been fairly popular among iOS users for some time and after a myriad of fake copy cats in the PlayStore over the last years, 2021 finally saw the launch of the real thing on Android: Videoleap has a very robust set of features for more advanced mobile video editing including additional video layers, keyframe animation, png transparency support, various frame rates (incl. 25/50), multiple aspect ratios for social media use and a pretty good UI overall. There’s currently one noticable problem with the Android version: As far as I can see you can’t yet record a voice over within the app which is absolutely possible on iOS. On the other hand however, Android users have one major advantage over the iOS version: On Apple’s system, the free version of Videoleap has a 90 second limit for exporting projects which is quite tough, on Android, there’s no such limit. The only limitation for the paid pro version (subscription or pretty hefty one-off payment) currently seems to be use of some special effects and image adjustment tools, there’s not even a watermark in the free version and I was able to export up to 4K resolution. That being said, you can sometimes tell that the app is pretty new on Android and hasn’t matured as much as for instance KineMaster – more than once I ran into hick-ups where the app froze when returning to it or an error occurred while exporting. But it might be unfair to expect perfection right from the get-go, Videoleap is definitely another great video editing option on Android!
Special mention (Motion Graphics): Alight Motion

Alight Motion is a pretty unique mobile app that doesn’t really have an equivalent at the moment. While you can also use it to stitch together a bunch of regular video clips filmed with your phone, this is not its main focus. The app is totally centered around creating advanced, multi-layered motion graphics projects, maybe think of it as a reduced mobile version of Adobe After Effects. Its power lies in the fact that you can manipulate and keyframe a wide range of parameters (for instance movement/position, size, color, shape etc.) on different types of layers to create complex and highly individual animations, spruced up with a variety of cool effects drawn from an extensive library. It takes some learning to unleash the enormous potential and power that lies within the app and fiddling around with a heavy load of parameters and keyframes on a small(ish) touch screen can occasionally be a bit challenging but the clever UI (designed by the same person that made KineMaster so much fun to use) makes the process basically as good and accessible as it can get on a mobile device. The developers also just added effect presets in a recent update which should make it easier for beginners who might be somewhat intimidated by manually keyframing parameters. Pre-designed templates for graphics and animations created by the dev team or other users will make things even more accessible in the future – some are already available but still too few to fully convince passionate users of apps such as the very popular but discontinued Legend. Alight Motion is definitely worth checking out as you can create amazing things with it (like explainer videos or animated info graphics), if you are willing to accept a small learning curve and invest some time. This is coming from someone who regularly throws in the towel trying to get the hang of Apple’s dedicated desktop motion graphics software Motion. Alight Motion has become the first application in this category in which I actually feel like I know what I’m doing – sort of at least. One very cool thing is that you can also use Alight Motion as a photo/still graphics editor since it lets you export the current timeline frame as a png, even with transparency! The app is free to download but to access certain features and export without a watermark you have to get a subscription which is currently around 28€ per year or 4.49 on a monthly basis.
Special mention (Automated Editing): Quik


Sometimes, things have to go quik-ly and you don’t have the time or ambition to assemble your clips manually. While I’m generally not a big fan of automated video editing processes, GoPro’s free Quik video editing app can come in handy at times. You just select a bunch of photos or videos, an animation style, your desired aspect ratio (16:9, 9:16, 1:1) and the app creates an automatic edit for you based on what it thinks are the best bits and pieces. In case you don’t like the results you have the option to change things around and select excerpts that you prefer – generally, manual control is rather limited though and it’s definitely not for more advanced edits. It’s also better suited for purely visual edits without important scenes relying on the original audio (like a person talking and saying something of interest). GoPro, who acquired the app in the past, is apparently working on a successor to Quik and will eventually pull this one from the Google PlayStore later in 2021 but here’s hope that the “new Quik” will be just as useful and accessible.
Special mention (360 Video Editing): V360

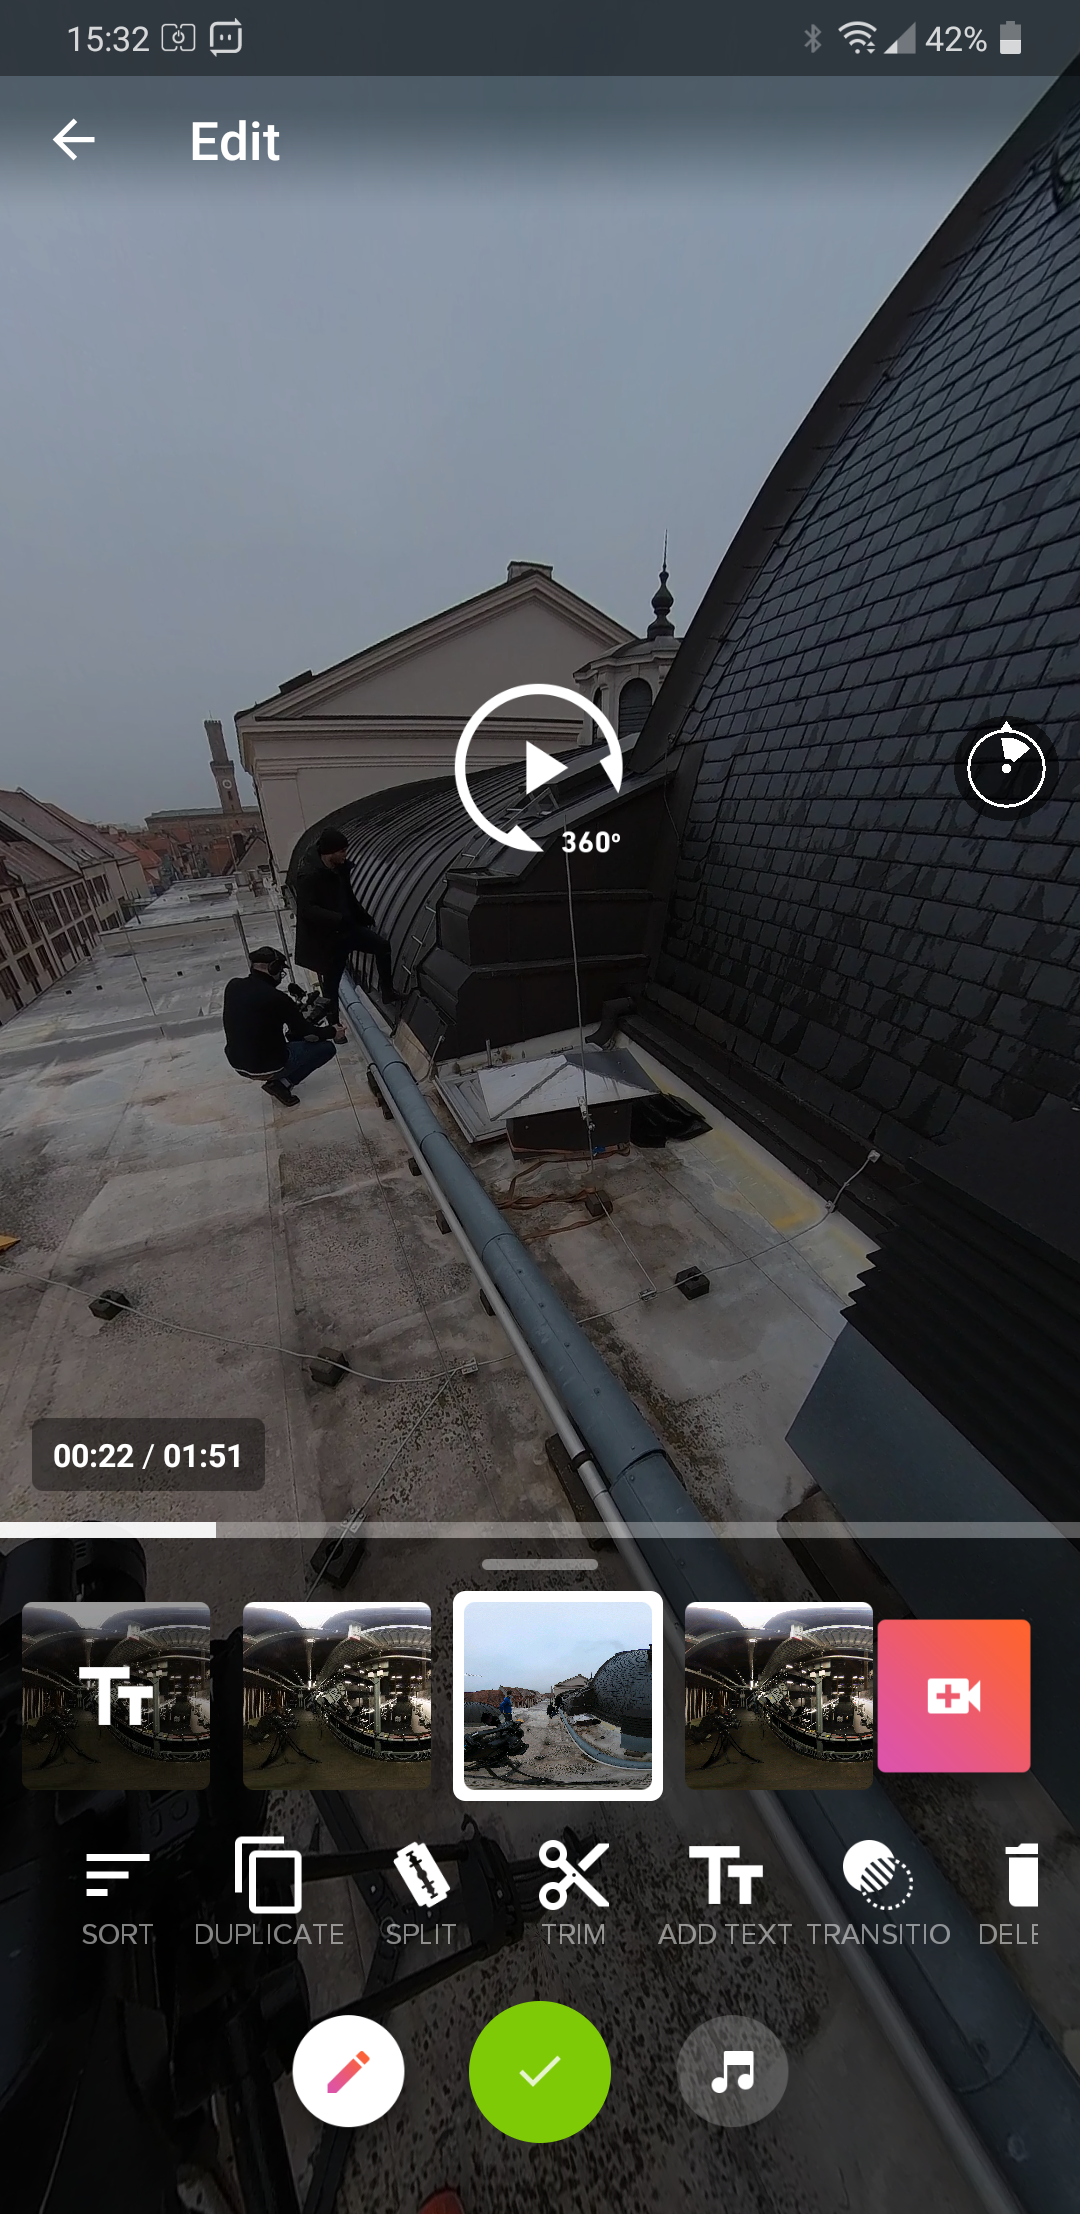
While 360 video hasn’t exactly become mainstream, I don’t want to ignore it completely for this post. Owners of a 360 camera (like the Insta360 One X2 I wrote about recently) usually get a companion mobile app along with the hardware which also allows basic editing. In the case of the Insta360 app you actually get quite a range of tools but it’s more geared towards reframing and exporting as a traditional flat video. You can only export a single clip in true 360 format. So if you want to create a story with multiple 360 video clips and also export as true, immersive 360 video with the appropriate metadata for 360 playback, you need to use a 3rd party app. I have already mentioned V360 in one of my very early blog posts but I want to come back to it as the landscape hasn’t really changed since then. V360 gives you a set of basic editing tools to create a 360 video story with multiple clips. You can arrange the clips in the desired order, trim and split them, add music and titles/text. It’s rather basic but good for what it is, with a clean interface and exports in original resolution (at least up to 5.7k which I was able to test). The free version doesn’t allow you to add transition effects between the clips and has a V360 branded bumper clip at the end that you can only delete in the paid version which is 4.99€. There are two other solid 360 video editors (Collect and VeeR Editor) which are comparable and even offer some additional/different features but I personally like V360 best although it has to be said that the app hasn’t seen an update in over two years.
As always, if you have questions or comments, drop them here or hit me up on the Twitter @smartfilming. If you like this article, also consider subscribing to my free Telegram channel (t.me/smartfilming) to get notified about new blog posts and receive the monthly Ten Telegram Takeaways newsletter about important things that happened in the world of mobile video.
For an overview of all my blog posts click here.
I am investing a lot of time and work in this blog and I’m even paying to keep it ad-free for an undistracted reading experience. If you find any of the content useful, please consider making a small donation via PayPal (click on the PayPal button below). It’s very much appreciated. Thank you! 🙂

Download KineMaster on GooglePlay
Downlaod PowerDirector on GooglePlay
Download Adobe Premiere Rush on GooglePlay
Download VN on GooglePlay
Download CapCut on GooglePlay
Download Alight Motion on GooglePlay
Download Quik on GooglePlay
Download V360 on GooglePlay

Thanks for sharing this high-rated and top blog information for video editing application. keep sharing and keep posting.
Fantastic roundup! 🌟 As an avid Android user, finding the right video editor is crucial for my content creation. Your detailed list of the best video editors for 2022/2023 is incredibly helpful. I’ve already tried a few recommendations, and they’ve exceeded my expectations. Thanks for keeping us up-to-date with the latest and greatest editing apps. Kudos to the team for this valuable resource!
6 Pingbacks