
Preface
So far, all the blog posts on smartfilming.blog were written by myself. I’m happy that for the very first time I’m now hosting a guest post here. The article is by Marc Blank-Settle who works for the BBC Academy as a smartphone trainer and is highly regarded as one of the top sources for everything “MoJo” (mobile journalism), particularly when it comes to iPhones and iOS. His yearly round-up of all the new features introduced with the latest version of Apple’s mobile opearting system iOS has become a go-to for journalists and content creators. iOS 15 just came out, so without further ado, I’ll leave you to Marc’s take on the new software for iPhones and don’t forget to follow him on Twitter! – Florian – smartfilming.blog
Introduction
Doesn’t time fly? It’s already a year since I made a video looking at what was then the latest version of iOS, the operating system on iPhones.
It’s also therefore a year since the equally traditional complaint of ‘preferential treatment’ to Apple over Android, the operating system on around 70% of smartphones globally.
However, it remains the case that iPhones and iOS remain the dominant device for mobile journalism.
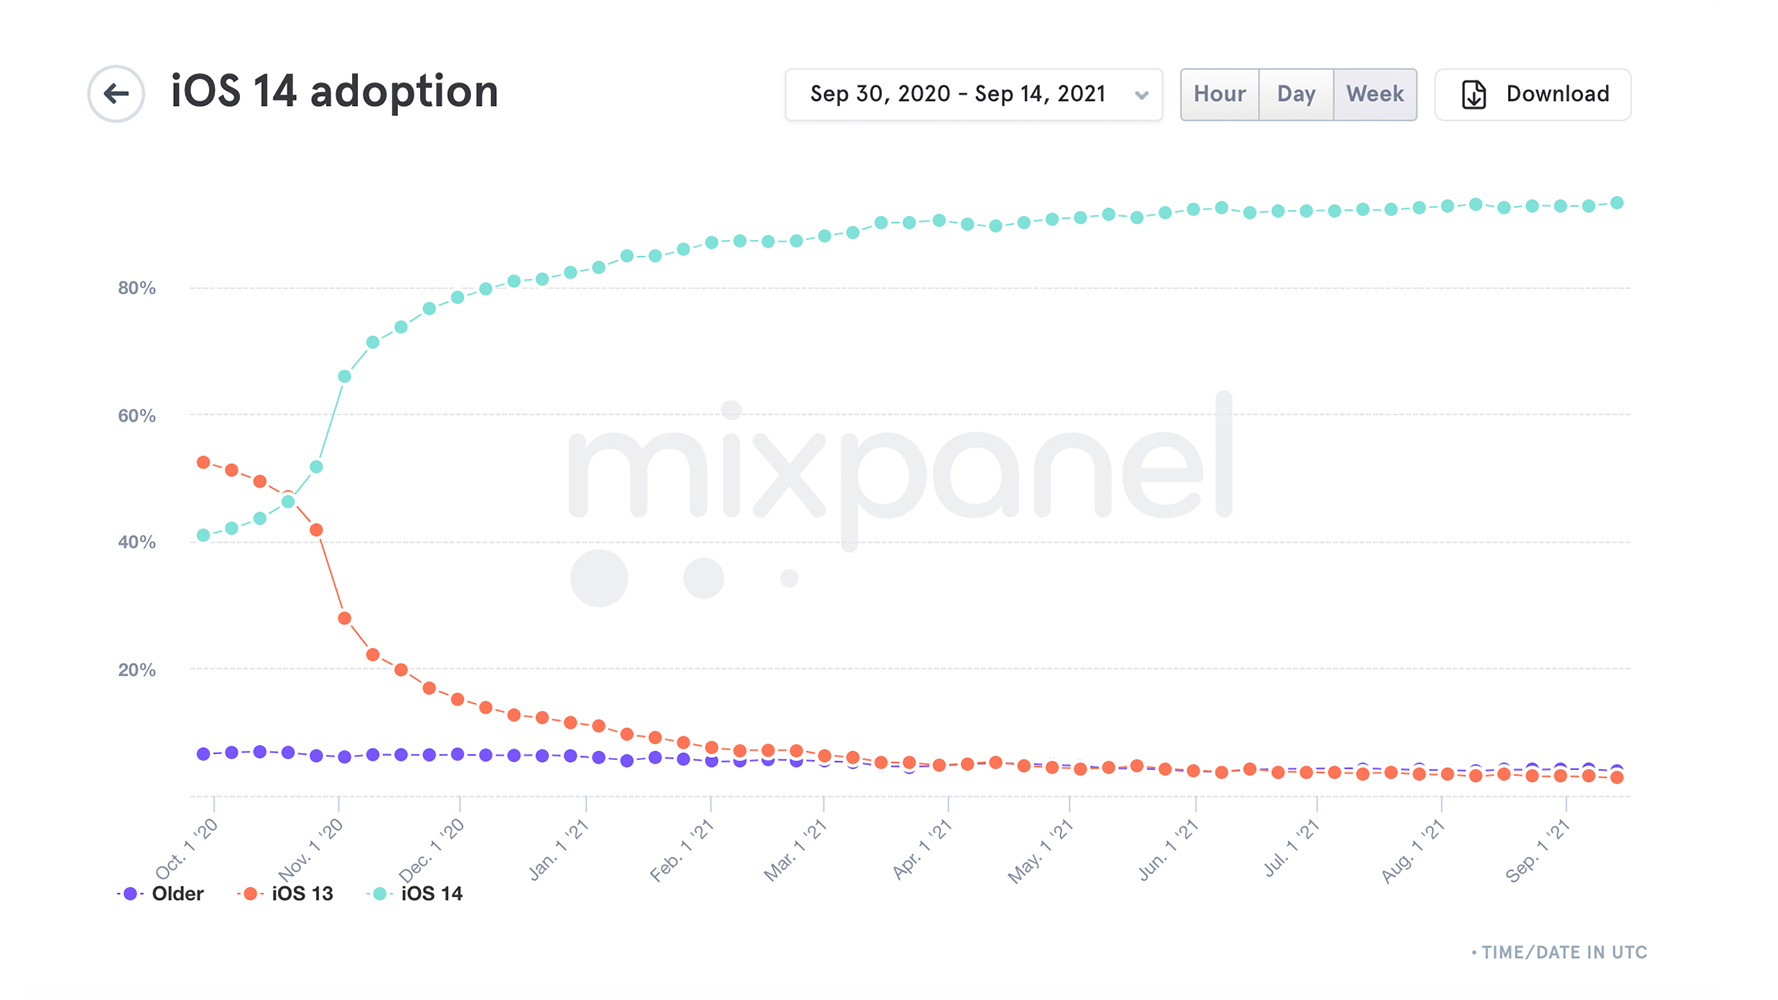
It’s also the case that this review of iOS 15 will be far more relevant, far more quickly, to iPhone owners if the pattern of previous releases is repeated. iOS 14 came out on 16 September 2020; a week later it was running on more devices than were almost a year later running Android 11 which came out a week before.

14 or 15?
In addition to new features and functions, iOS 15 also contains bug fixes and security updates to protect your device against malware, spyware and viruses. But in a radical departure, users can for the first time get all these fixes and updates without taking the new version of iOS.
Up until now, the only way to get the latest protection was to get the latest software version. But now, you can stay on iOS 14 and only take the security updates included in iOS 15 and not the new features.
To do this, go to ‘Settings-General-Software Update-Automatic Updates’ and turn off the options you see here for downloading and installing iOS updates. When Apple releases security patches for iOS 14, you’ll see them in the Software Update menu instead of the iOS 15 updates.
For some users, especially with older devices, this strategy might be worth considering. If you’re still on the 6s or the original SE and your battery depletes quickly, the extra strain of iOS 15 might not be worth it for you.
Or maybe after reading this review, you might just want to keep everything as it is in terms of how your device works, but you understandably want to take the bug fixes.
Which devices can get iOS 15?
If your iPhone is a 6s, original SE or newer, iOS 15 can be downloaded to it.
But not everything is coming to every iPhone which can download it, as rather than frustrating users by giving their phone some features it will struggle with, Apple have chosen to simply not make them available to older devices.
Most people won’t be aware though that their 7 or 8plus is missing out on new goodies – although you will, after reading this review.
The cut off tends to be the iPhone X and older: if you have one of those devices, then there are about ten additions which you won’t get. Anything newer, and you’ll get everything although there are a few extra things reserved just for the iPhone 12 series of 2020. When this review gets to those features which are only for certain phones, I’ll flag that up.
Additionally, some things which Apple highlighted in their big reveal of iOS 15 in June 2021 have been postponed and won’t in fact be available until 15.1 or later; these too will be flagged up.
Finally, this review reflects to a degree how I personally use my iPhone. I’m not a great user of Reminders or Notes so I won’t be able to do justice to any changes made for that or any other aspects of iOS which I myself neglect.
Mainstream mojo
Usually, my review of the new features for mobile journalists of the forthcoming version of iOS goes BIG on video, audio and photos – the mainstays of mojo.
But not this year, at least not quite to the same degree.
I’m not saying there’s nothing of interest to mobile journalists, or I wouldn’t have spent hours researching, writing, and putting this all together. But there’s certainly not as much as its immediate predecessors, iOS 13 and 14.
From my perspective, there’s nothing new for videos, photos and audio creation using Apple’s in-built apps with a huge “wow” factor. The key word here is “creation”: iOS 15 doesn’t immediately permit anything radical in terms of how content is gathered. But there are clues of what third-party developers may be able to do to benefit users.
Video bokeh
The first big change for video in iOS 15 could go some way to addressing one long-standing complaint about footage recorded on an iPhone – that too much is in focus, unlike the material from a ‘proper’ broadcast camera used in news, documentaries, wildlife programmes and so on.
Known as ‘bokeh’ or, more prosaically, ‘blurry background’, it’s the visual effect whereby the main subject of a video, such as an interviewee, is fully in focus while the background behind him or her is not.
It gives depth to shots and a blurred background means the viewer can concentrate on what is being said rather than wondering where the interview is being filmed. On an iPhone, all the footage tends to be in focus unless the subject of a shot is very close to the lens.
Due to the lack of a big image sensor needed to produce ‘natural’ bokeh, smartphones rely on software to artificially create and simulate the blurred background effect. Apple introduced this to photos in the iPhone 7Plus of 2017 with ‘Portrait Mode’ but it’s taken a full four years of advances to get it working on video – even if they were beaten to the punch by third-party apps like Focos Live.


Facetime Portrait Mode
If you’re lucky enough to be able to afford a model from the iPhone 13 series, then you’ll have bokeh for video albeit at 30fps which suits the requirements for footage shot in North America but is not what’s needed for TV in the UK and much of the rest of the world.
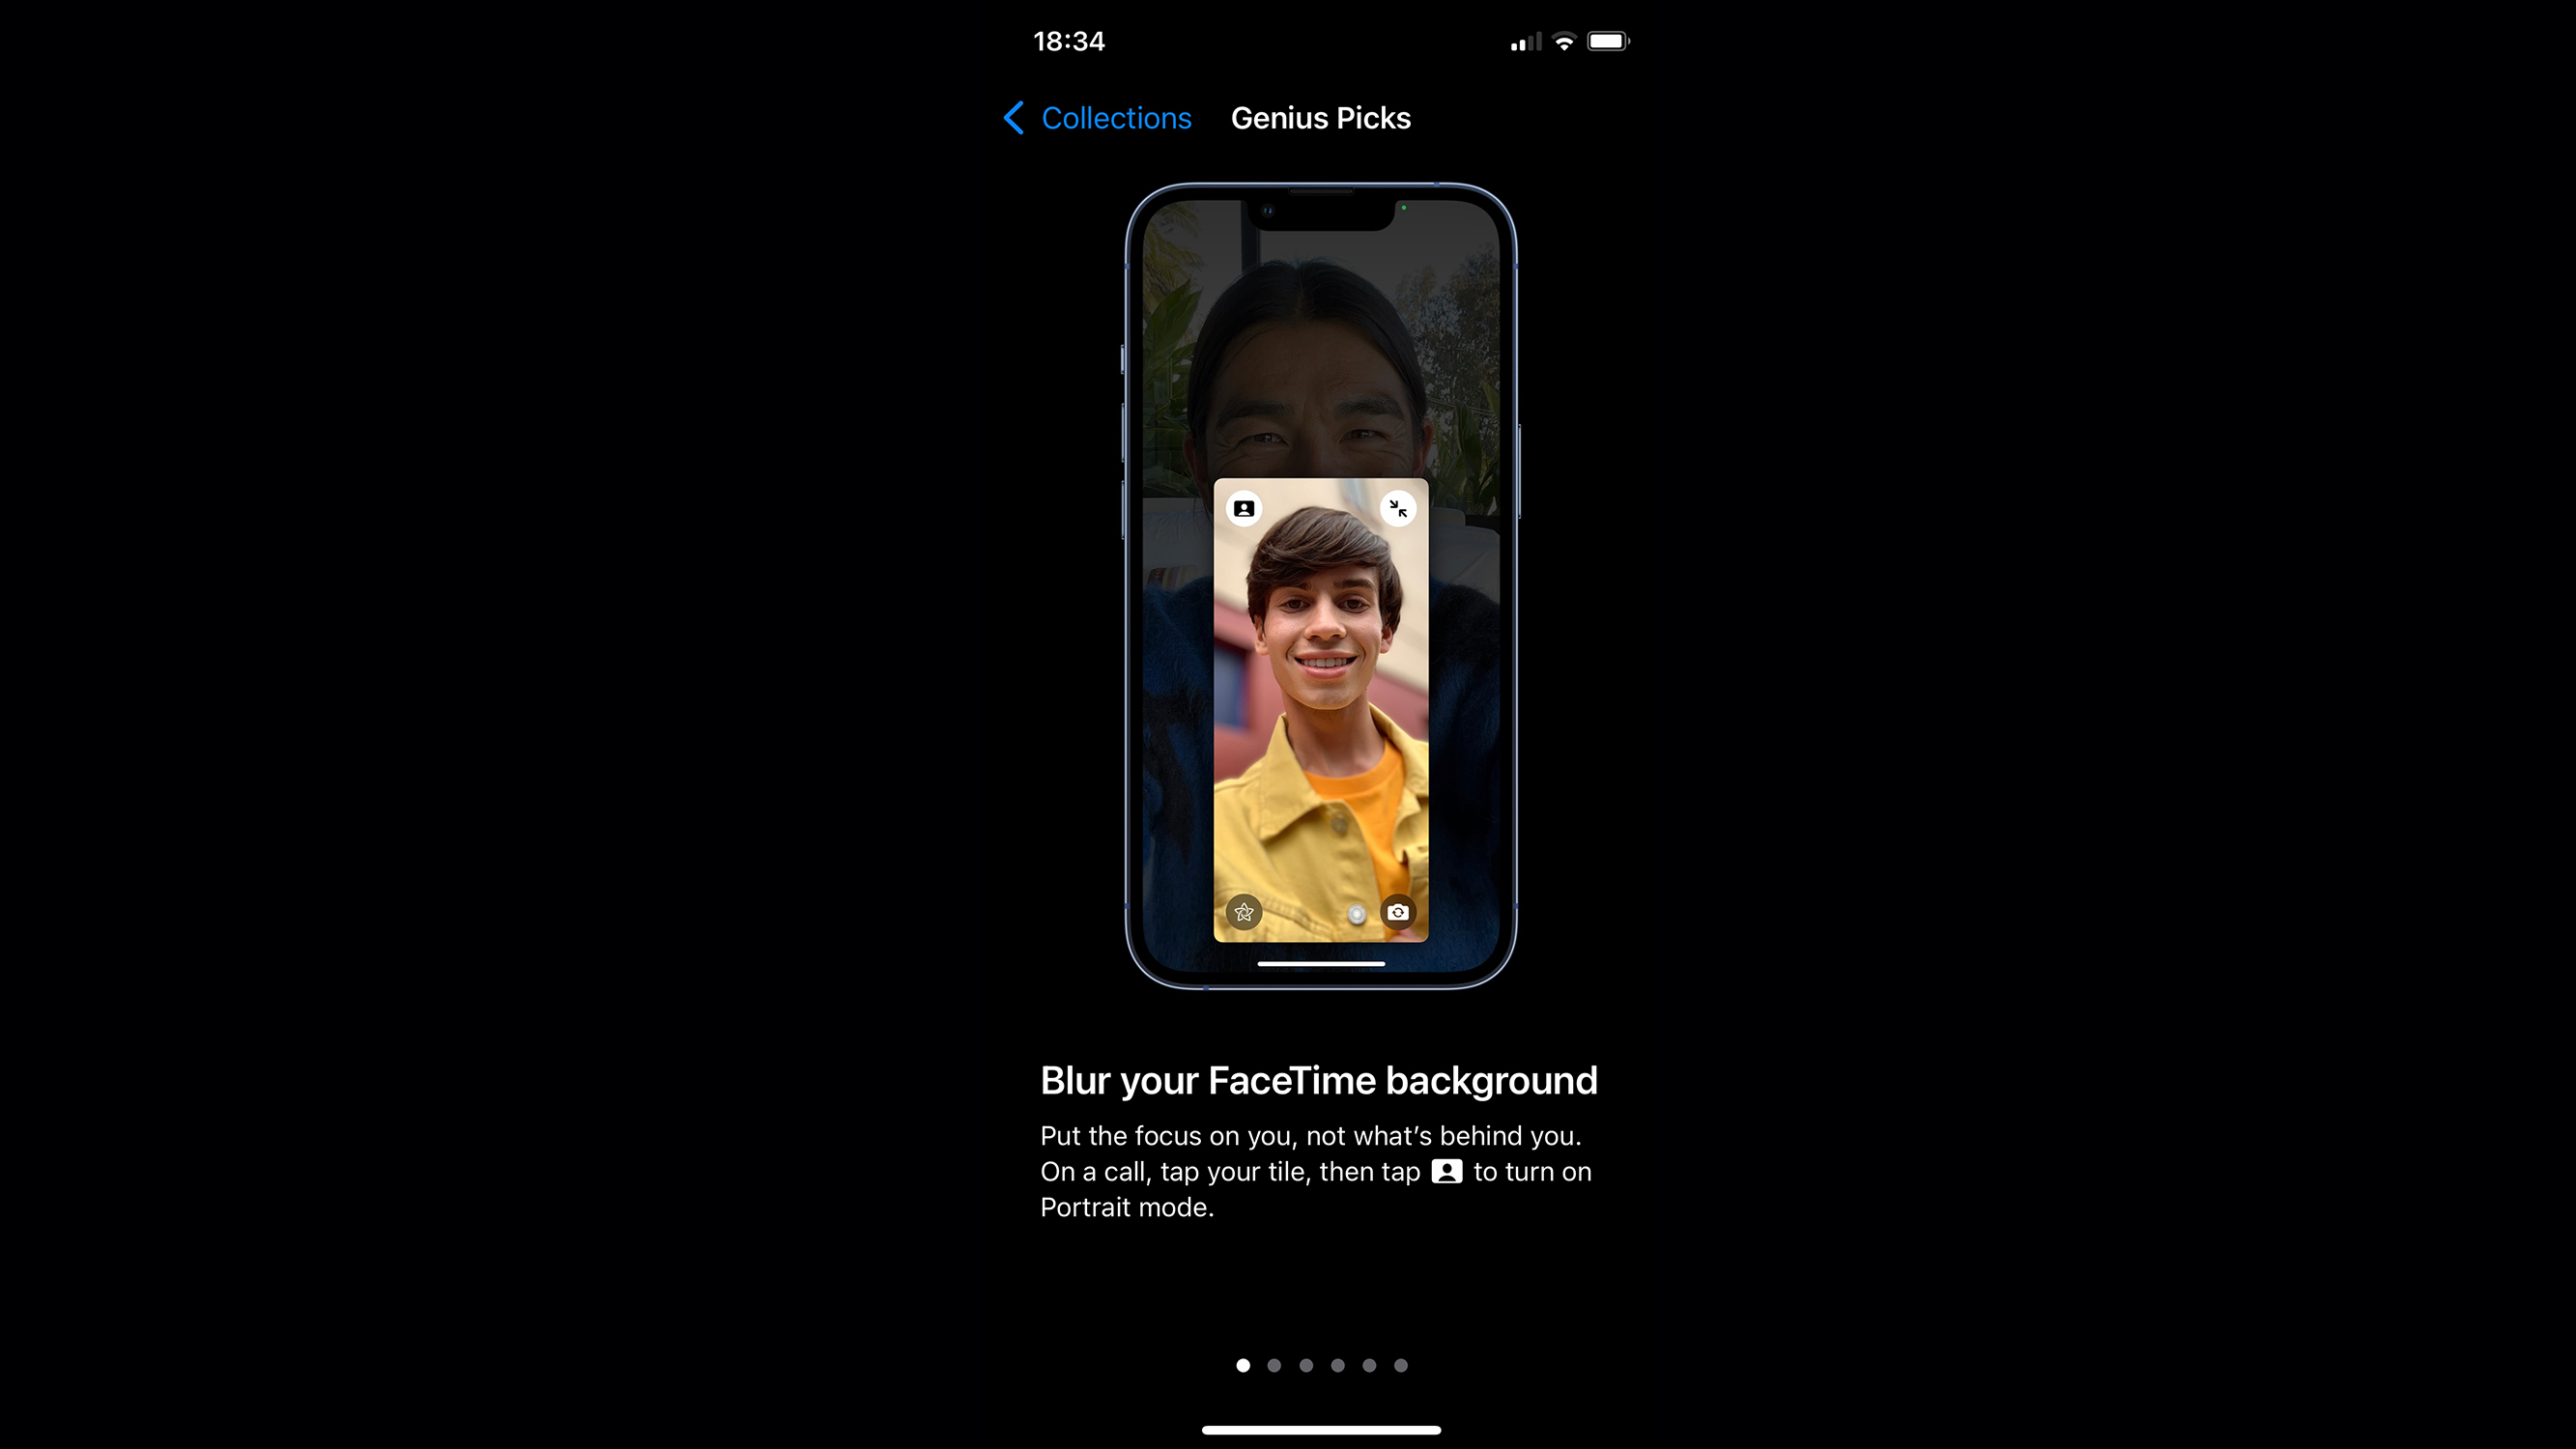
But if you have an iPhone XS or newer, then iOS 15 does offer a Portrait Mode option on video on Facetime, as well as a few select apps which already offer a blurred background feature such as Instagram, Snapchat and Zoom.
Open the app you want to use and then Control Centre; a new ‘effects’ tile is visible and once pressed, you can toggle ‘Portrait’ on or off.
Or you can do it straight from within Facetime itself:
Bokeh video beyond FaceTime?
This could all get really interesting if developers of professional video filming apps like FilmicPro or MoviePro are able to bring this functionality into their apps, giving bokeh to iPhones at the preferred 25fps or even 50fps.
But if it can only be done with the 13 series and not these older models, then journalists unable to acquire the very latest devices won’t be able to benefit from this innovation fully.
As for how it could benefit journalists, depth of field to footage would help close the gap further with the results from ‘big’ cameras. Purists though may still rail against the artificial computer-generated aspect and the fact that it can be adjusted in post. Equally, early results I’ve seen have on occasions been less than impressive with the blur failing altogether or being inconsistent especially around the edges of clothing and hair which is not a failing of “big” cameras.
Audio options in FaceTime
The audio for FaceTime calls also has new features which may too get incorporated into other apps in the coming weeks. Available via Control Centre again, users will see a new ‘Mic Mode’ tile which when pressed gives three choices: standard, voice isolation and wide spectrum.
The first should need little explanation; the second tries to suppress ambient noise as best as it can, to focus better on the person speaking; the last does the opposite, incorporating environmental sounds and other people speaking in the background in case you want the person you’re on a FaceTime call to be able to hear everything that’s happening in your surroundings.
Is this useful for journalists? While it’s never a bad thing for a speaker to have more clarity, the tests I’ve done indicate it’s of limited benefit but that could have been because there was too little or too much ambient noise where I was at the time.
My results echoed those of a colleague who tested it on the other end of a FaceTime call. We could hear the other person better with voice isolation on, although it sounded noticeably processed, almost artificial, in quality. Wide spectrum did indeed boost the background noise.
If there are several people on the same call, then Spatial Audio kicks in (again, not if your device is an iPhone X or older) where the audio sounds like it’s coming from where each person is on the call. Again, this is another one where the clever work from independent developers, taking on the new features and pushing it further in their own apps, could be key.
Other FaceTime features
Before leaving FaceTime, a few other innovations it is getting in iOS 15 are worth mentioning even if they could be viewed less as ‘innovations’ and more ‘catching up with what’s been possible for a while on other cross-platform video calling apps like Zoom, Skype and Facebook Messenger’.
There’s a ‘mute alert’ for those enjoyable moments when someone speaks while their mic is muted. Also, users can now make FaceTime calls to PCs and Android devices, not just to those in the Apple ecosystem, with end-to-end encryption. You can also now invite anyone to a FaceTime call with a link.
One suggestion from Apple is to send a FaceTime link via WhatsApp, but I’m trying to get my head around why anyone would send a FaceTime web link via WhatsApp, encouraging someone to join a FaceTime call…when they could do a video or audio call on WhatsApp itself?
Finally, one big feature touted in Apple’s original ‘here’s what’s in iOS 15’ keynote event won’t be available from day one: Share Play, where you can share a video you’re watching with someone else so you can enjoy it together over FaceTime.
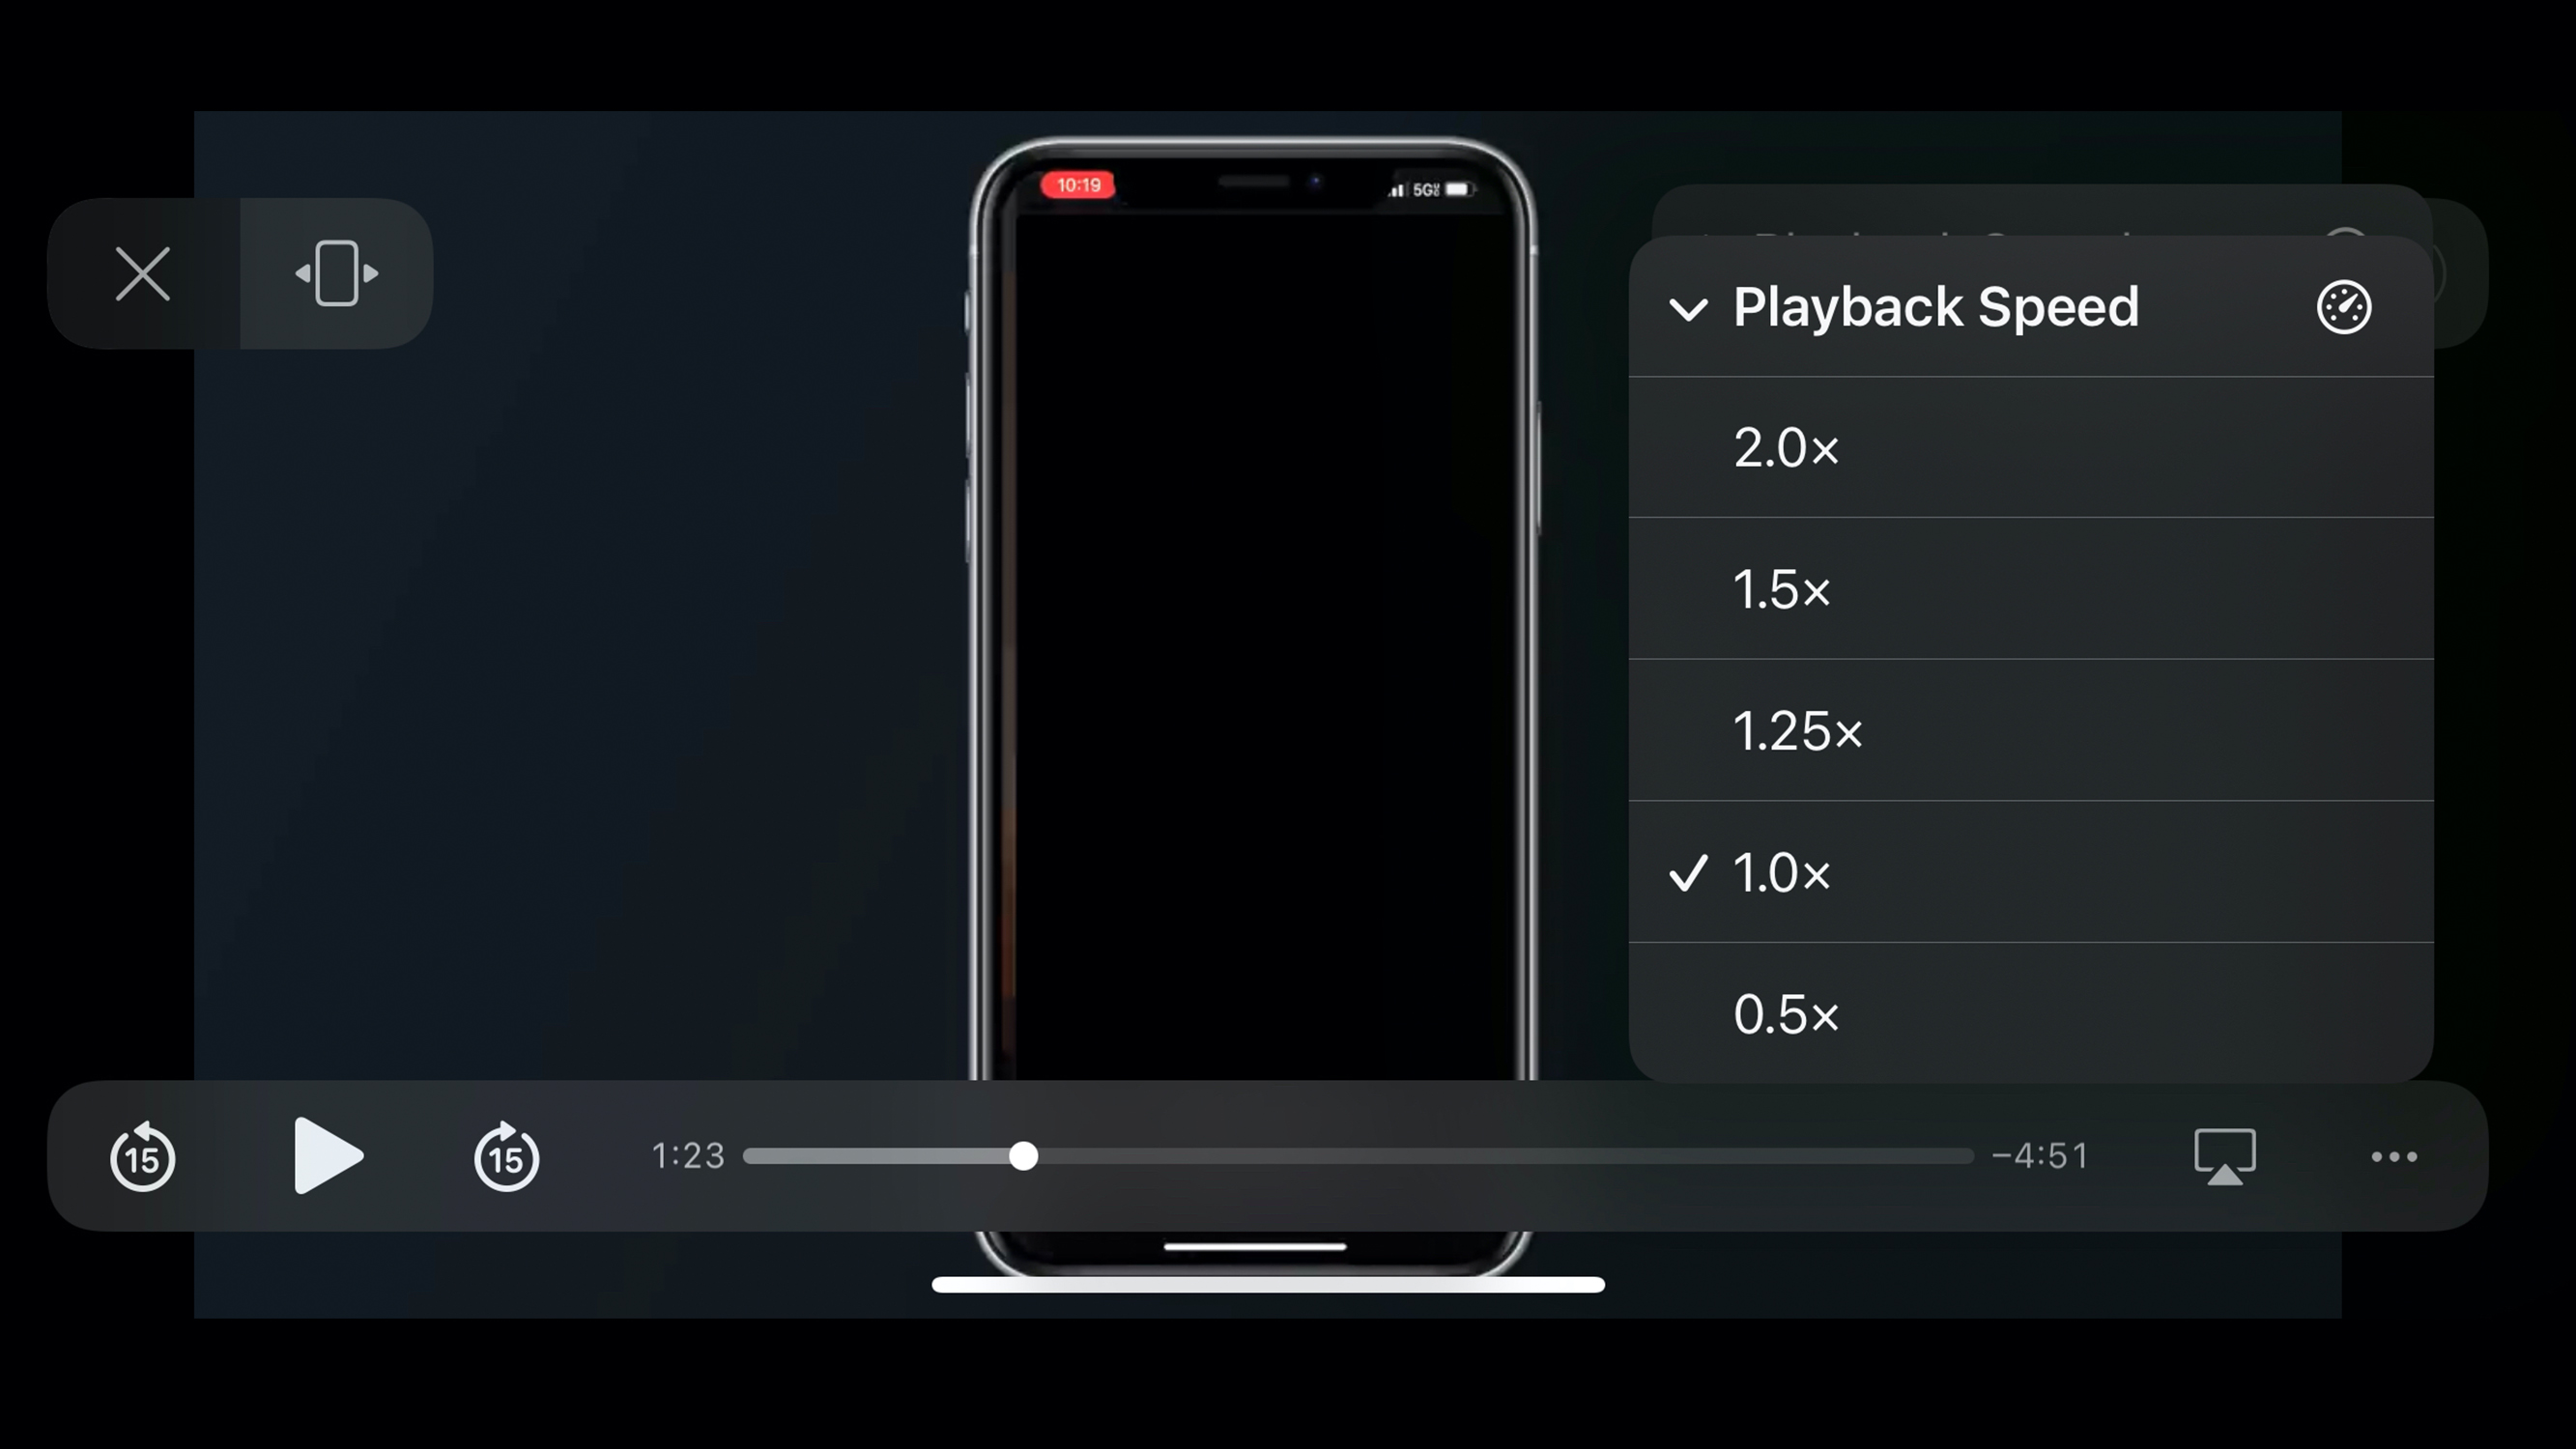
Video playback options
When playing a video embedded on a website, three dots in the bottom right corner signify further options including the new ability to increase the speed at which the video plays, up to two times faster. It can also be slowed down to half-speed if you feel that’s absolutely necessary.
Video editing tweaks
For those editing their videos within iOS itself, rather than any 3rd party app or transferring the footage to a Mac, one welcome tweak makes this job a bit easier. Previously, editing a video caused it to shrink on the screen; now, tapping double-headed diagonal arrows will expand the video to full screen so you can see better what it looks like. You can even widen your fingers to expand the frame even more.


EXIF data
There’s also more information available about videos as well as photos, as iOS 15 incorporates a feature long available via 3rd party apps – the EXIF data.
EXIF stands for Exchangeable Image File Format. Rather than needing to note down separately information about an image or video, such as camera exposure, date/time the image was captured, and even GPS location, it’s embedded in a special file alongside the media itself.
Before iOS 15, there was a time-consuming workaround to see the EXIF data, involving transferring an image to Files and then another dozen taps; numerous third party apps could do it too.
But it is all now directly visible within the Photos app (still known to many as ‘the Camera Roll’). Tapping on the (i) under the photo or video, or simply swiping up on it, will show which lens was used, the resolution, the size, ISO, shutter speed, frame rate and more.


The benefits of EXIF data
In addition, it’ll show the name of the app if it was taken with a 3rd party app, and tapping that name will result in all the media captured with that app being shown. You can also access that material another way, by searching for the app’s name.
For journalists, knowing the file size of a video can be beneficial as the size can gives an indication of how long it might take to upload, always bearing in mind there are numerous other factors in play here such as the speed of the connection.
It’s also worth pointing out that the file size of a video, along with other EXIF data, is already available for videos in the PNg library, by loading a video and tapping the (i)
Whether journalists can use the EXIF feature to verify the date and time when material was captured will depend on the method used to share it. WhatsApp strips the date and time from material, with the result that iOS only shows the date and time of receipt; if it’s uploaded to Dropbox, then downloaded and saved to Photos, then the metadata is retained and visible.
Finally, while the inbuilt EXIF data shows a lot of information, it doesn’t show everything. For example, with a video, it omits the bitrate which can be useful to know as it gives an indication of how much data is in the video – the higher the bitrate, the better. Transferring the file to a Mac will reveal a lot more info besides.
Another change relating to photos and videos has come about quite possibly as a direct result of how EXIF data is accessed. On a live photo, swiping up showed the options for adjustments such as looping it or bouncing it back and forth. Now that swiping up reveals the EXIF data, the Live Photo adjustments are now accessed from a drop down in the top left corner.
Live Text
Live Text is another change for the XS and newer; if you have an iPhone X or older, you can just read on in envy. Android users will also be reading on with a wry smile as the ‘new’ Live Text feature has long been available on many Android devices.
Go to ‘settings-camera’ and you’ll see a new ‘Live Text’ option. If you don’t want to use it, turn the green light off; but otherwise, turn it on and you’re good to go.
On compatible iPhones, the device can now ‘read’ text in photos, be that ones taken months or years ago and already in the Photos app or ones you’re about to take with the live camera. The text can be printed or handwritten too.
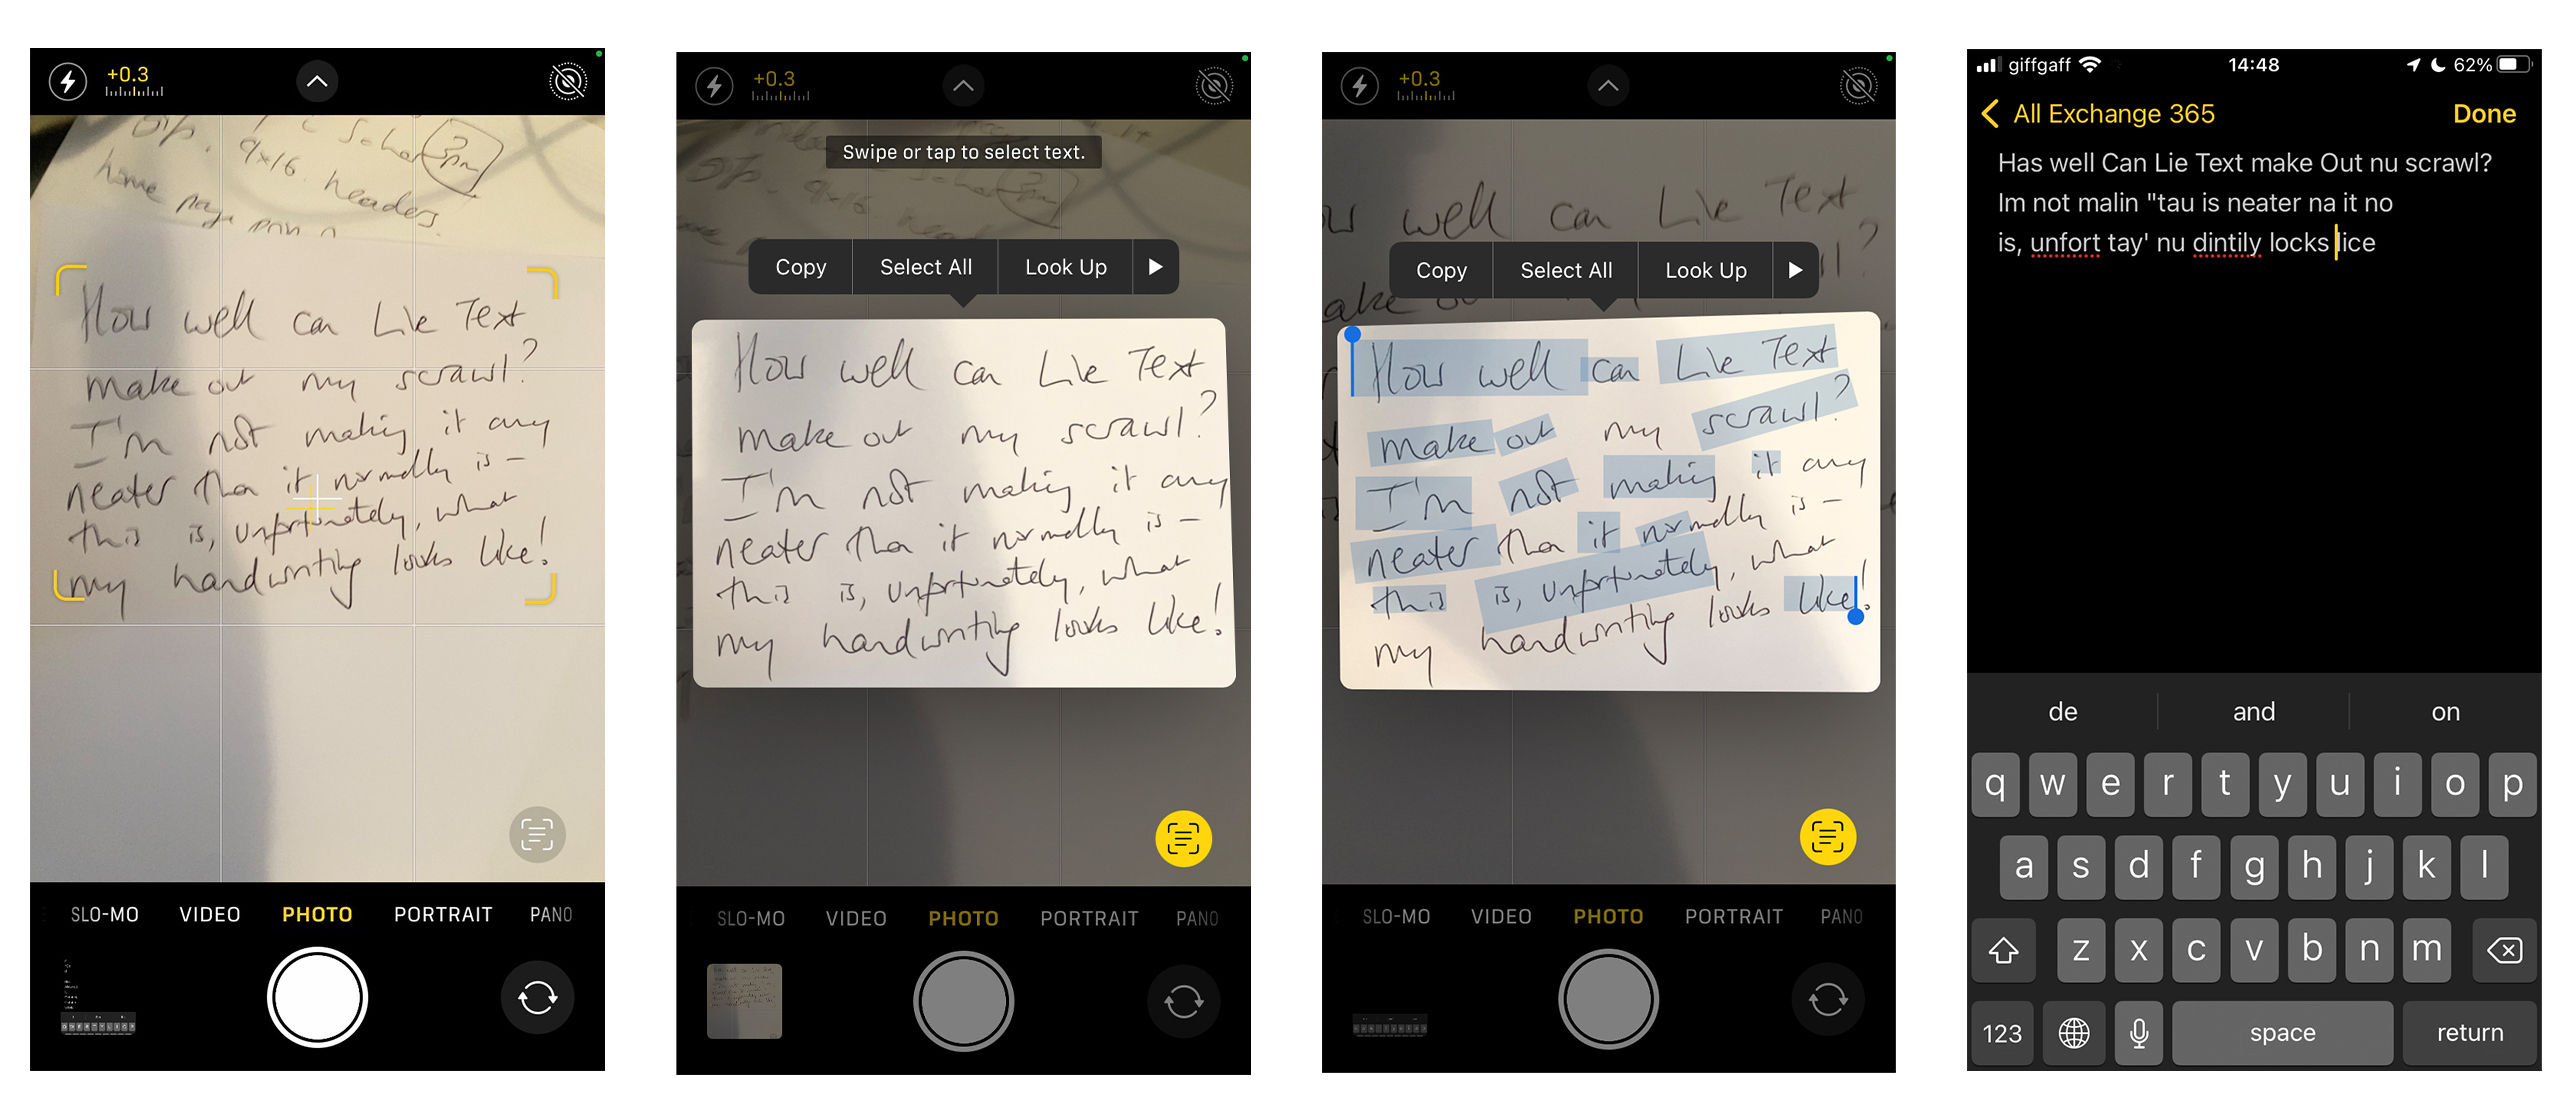
When you have the camera open, look on your screen to see if the live text icon appears.
If it doesn’t, you might need to move around until it does.
Once it’s visible, you’ll also get yellow brackets around the text that is now interactive. If the text you want to use isn’t within the brackets, move your phone around again until it is.
When ready, tap the Live Text icon and you’ll be able to select all or some of the text.

You’ll then be able to do things like copy it to paste into an email, or tap a phone number to call it, or start an email with the address in the ‘to’ field or even translate text into certain languages.
With photos already taken, the process can be even simpler depending on the text in question which the phone can “see”. If there’s a phone number or email address, simply tap it to use it; if that doesn’t work, a gentle tap elsewhere on the screen should bring up the Live Text icon which will definitely make the text in the photo interactive to use as suggested above.
It also works with handwriting, within reason.
When Live Text can be useful
How might journalists use this? It’ll depend on the text in question, but the possibilities are huge. In addition to calling phone numbers or using email addresses as already suggested, you could tap an address to get directions to it. If there’s a time and date, tap it to add it to your calendar.
Or you might have been given a document and you need to use the text from it. Use the Live Text option to scan the words and you can instantly drop the text into an email rather than laboriously typing it out yourself – once you’ve checked it’s not missed out any words, such as ‘not’ from ‘my client will be pleading not guilty to all the charges’.
Visual Lookup
Staying with new tricks that can be done with photos, your device should soon be able to give you more information about what is actually in them through ‘Visual Lookup’.
A very similar feature has already been available on iPhones and Androids via the Google Lens app but it’s now being incorporated into iOS itself. Having said that, it only works on iPhones inside the USA and even there, not on on an iPhone X or older. But when it’s released beyond the borders of the USA, users with compatible devices should look for a small star on the (i) under photos.
That indicates that the feature is active and you can use it to identify a plant, a landmark or animal.

Finding photos
Another useful addition for Photos but one which isn’t limited to certain iPhones and in certain locations, like Visual LookUp, is the ability for your iPhone to find text in your images.
This is via the Spotlight search option, which is activated by a quick swipe down on any screen of your device. Once you’ve updated to iOS 15, your iPhone quietly scans all your photos for text they contain; Spotlight can now search for the text you ask it to find, and it’ll display the results.
I’ve found this quietly impressive, with Spotlight always returning the photo with the required text. So if you know you have a photo of a document with someone’s name in it, this is an efficient way of finding it rather than trawling all your photos.
Voice Memos
I’m going to omit some other photo and video changes as I don’t think they’re very journalistic (such as the Memories feature for content in your camera roll) so I’ll end this mojo-centric section with a sentence or two about Voice Memos, the iPhone’s audio recording app which now has a feature to skip silences on playback.
It does an ok job from what I’ve found, even if it’s a rather blunt and artificial way of shortening a recording. It’s also doesn’t work at all as an editing tool because when you share audio with the silences skipped (for example by AirDrop or email), the recipient gets the audio with all the silences back in as if you’ve done nothing to it. But if the length of audio is still too much for you, then iOS 15 lets you play it back at up to twice the speed.
Changes to Safari
Muscle memory can be important for many smartphone users: you know where certain apps are on your screen or you know exactly where the ‘reply’ button is on your favourite social media app. But hang on to your hats as iOS 15 brings in a big change to Safari, the main web browser on iPhones, meaning your muscles may have to relearn everything.
The URL address bar – where you enter a website’s address or a search term – has moved and now defaults to being at the bottom of the screen. For as long as anyone can remember, it’s been at the top.

The thinking is that with so many of us having phones with larger screens, the address bar at the top was a strain to reach given our hands haven’t grown to match.
So, moving it lower down the screen makes it easier to access. My wife is admittedly something of a small sample size, but when I showed her Safari on iOS 15 (yes, the evenings just whizz by at our house) she immediately spotted the repositioned address bar and commented on how much easier it made it to use.
But even after using the beta of iOS 15 for several months, my fingers still twitch automatically towards the top of my screen.
All hope is not lost though if you want to return to things as they were, as there are two ways to do this: either by tapping on the aA on the address bar itself and then ‘show top address bar’ or navigate your way through ‘settings-safari-single tab’.

That these options even exist is a concession by Apple as initial versions of Safari in iOS 15 had the bar at the bottom, like it or not. Such was the outcry that Apple moved enough to allow users to move the bar, even if the change wasn’t fully abandoned.
But the point remains that there’s nothing to tell users after they’ve upgraded that they can in fact return Safari to the top of the screen and I predict there’s going to be a lot of confusion over this change.
If you do like the new place for Safari, you’ll gain another feature that’s missing when it’s at the top: the option to swipe left and right between websites.
Tab groups in Safari
One new feature within Safari which many journalists could find useful is called a “tab group”.
Let’s say you’re working on a court case and you have numerous pages open relating to it; but you’re also planning a dinner party for friends and you have several pages of recipes open; and you’re also thinking ahead to a holiday and you’ve lots of hotel websites open. Instead of all these pages being jumbled up together, you can create a tab group and put only one set of pages into that group, not the others.
When you want to access just the court case pages, tap to open that group and they’ll all be accessible. It’s a bit like bookmarking a website but more efficient as all the tabs open as soon as you swap to the group.
Safari Extensions
Mac users have had extensions for Safari for years. These powerful little add-ons extend (hence the name) what can happen in Safari, and they’re now available for iOS. Once you’ve given an extension permission to interact with websites, how you use them to benefit your journalism will depend on the ones you install.
Introducing Focus
Whether you just want to get on with your work or want to prevent phone calls interfering while you’re filming something, Do Not Disturb has long been a failsafe.
But now there’s a super-charged DND, known as Focus. It has replaced the DND tile in Control Centre and also within Settings.
Additionally, there’s a lot more you can do with it although it’s worth pointing out here that you don’t HAVE to use these new features. If DND was enough for you, just turn it on as before.
But for the more adventurous, you can do a lot more now as you’re presented with four default Focuses (Foci?) which can each be configured to your liking – and you can also make your own entirely new Focusessses.

Once you’ve activated a Focus on one device, it syncs across to all devices with the same Apple ID. You could set up the “personal” one so friends and family can still send you notifications, while work would only let selected colleagues do that.
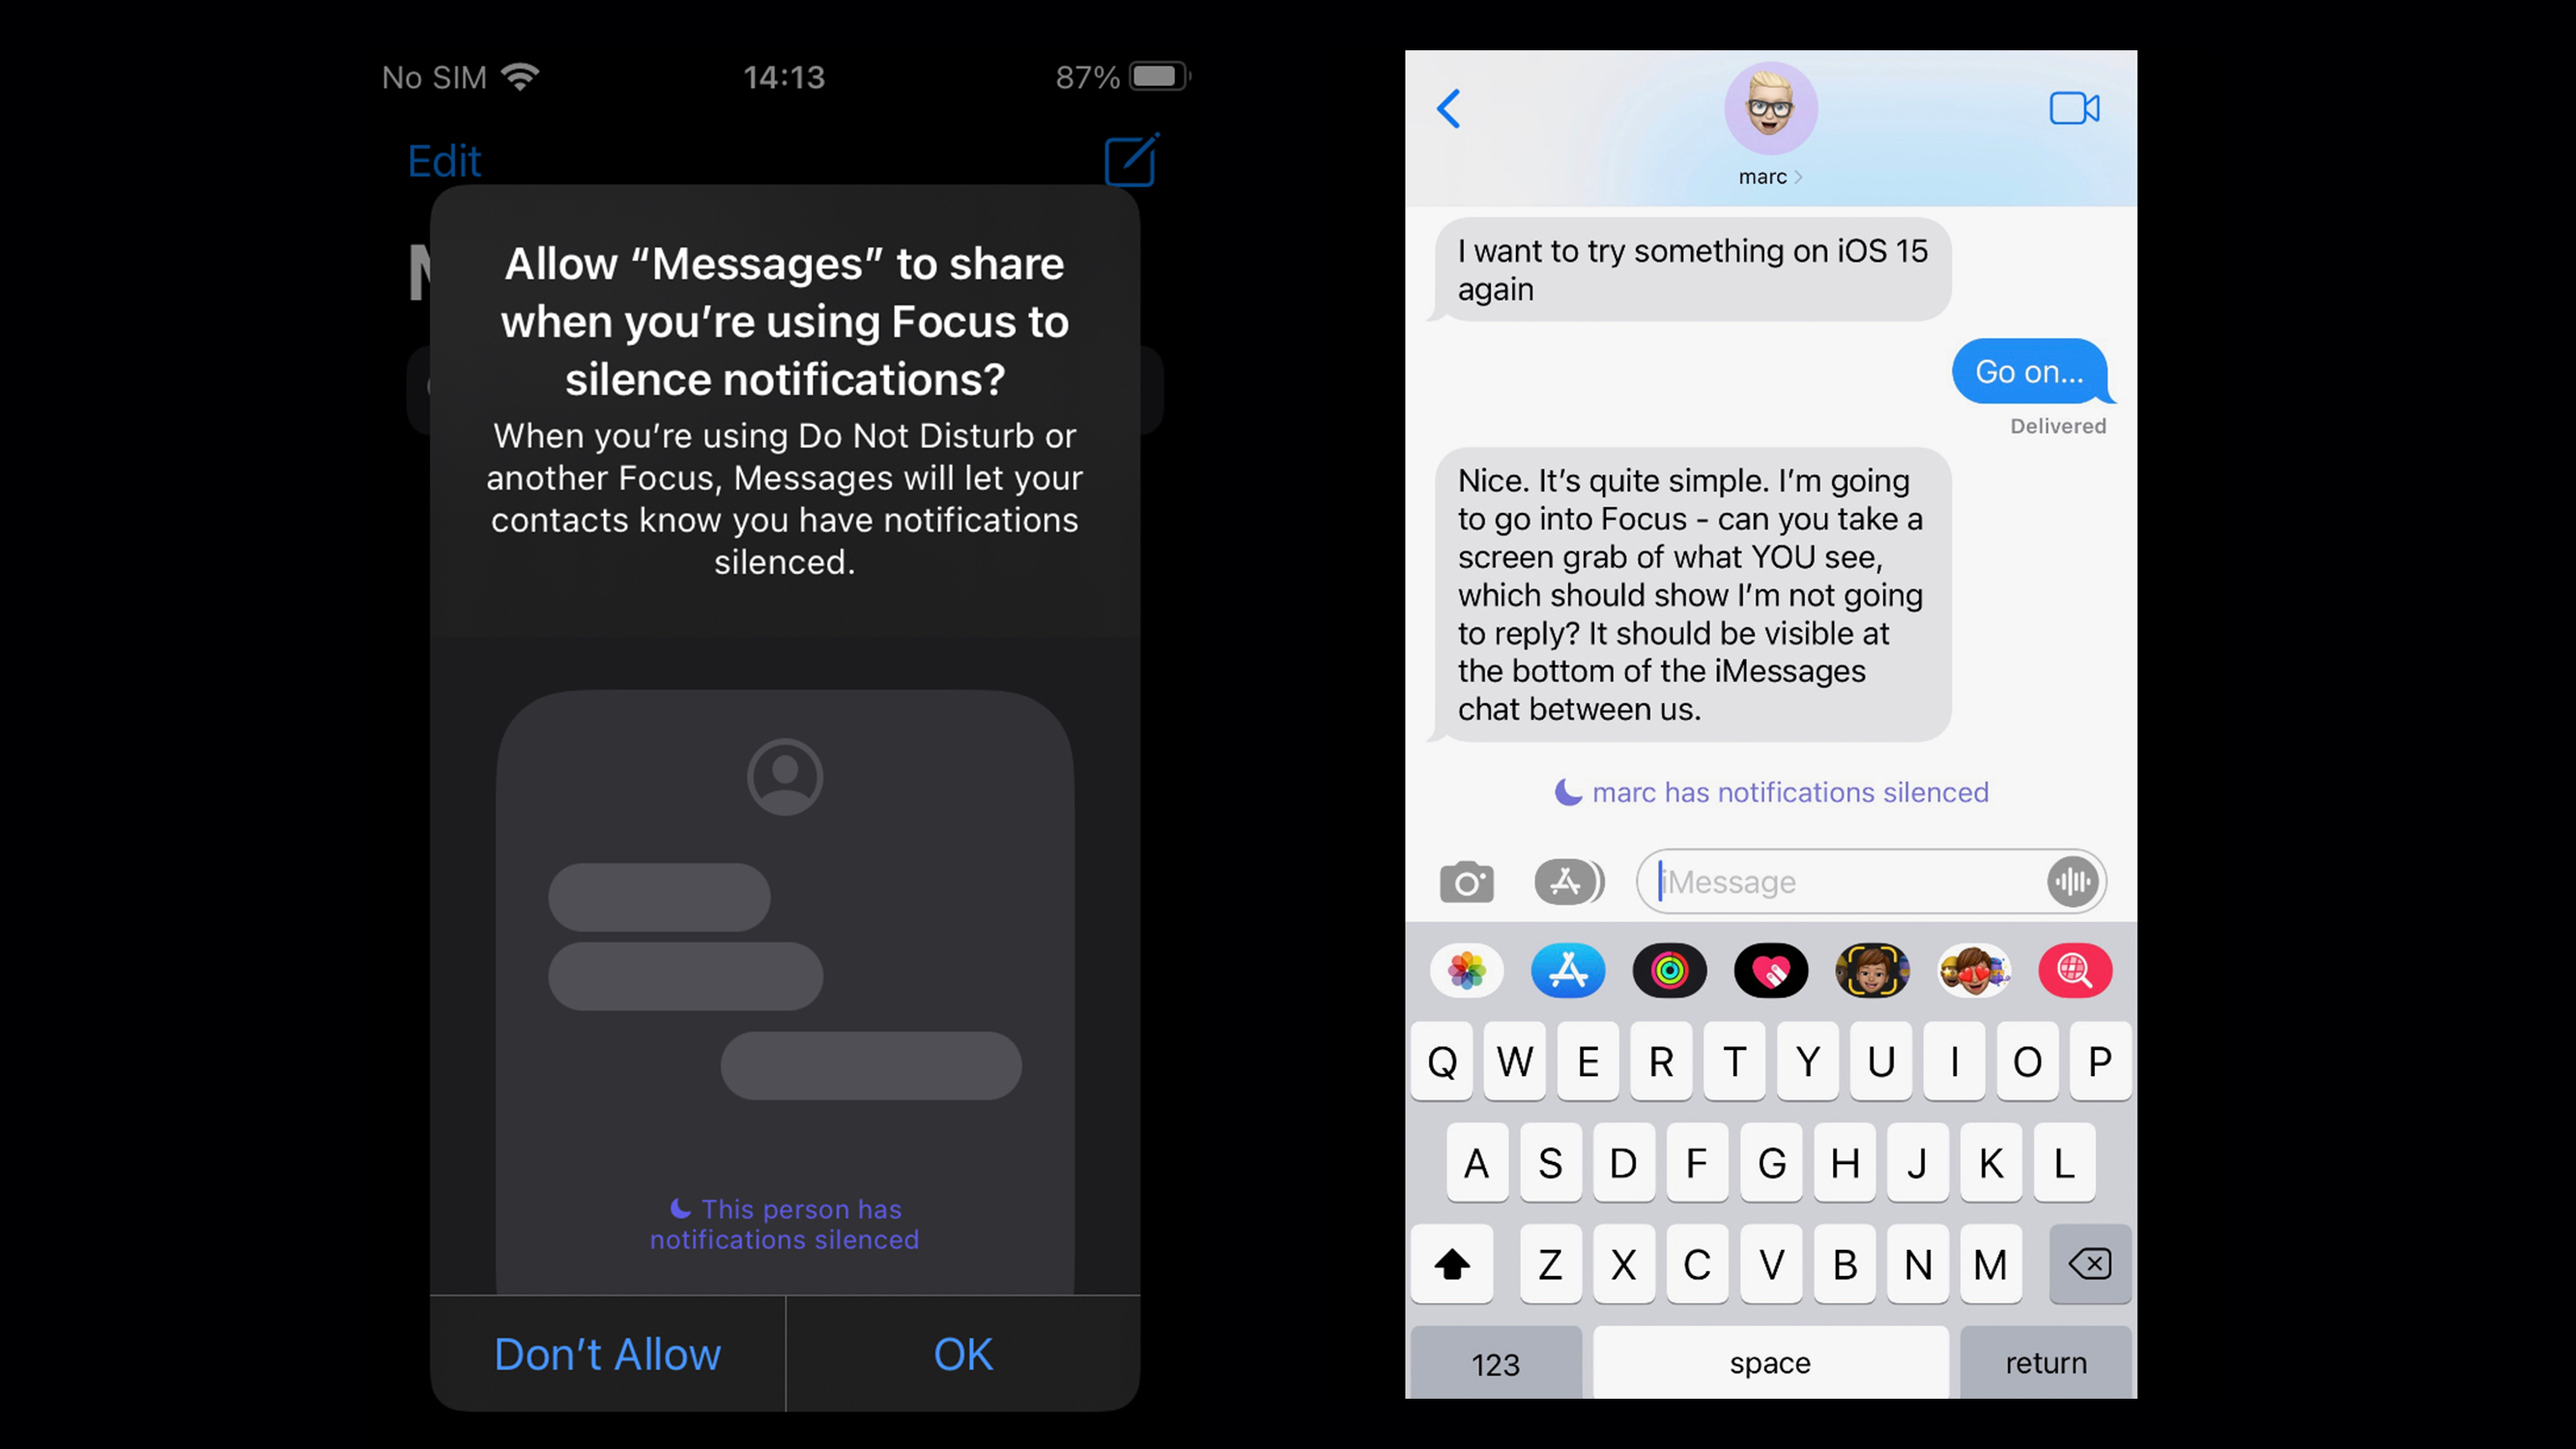
The fact you’re in a Focus can be shared with others so when they message you, the sender should understand why you’re not replying and that you’re not actually ignoring them. That may not be enough to placate and buy off a stressed output editor on all occasions though.
Breaking through a Focus
If they really insist they need to be able to contact you at all times, you can tweak things so that their (but only their) notifications are allowed through. The same can be done with apps, as ones you choose can still send their notifications.
If someone hasn’t been put on that whitelist, then they have the option to tap “notify anyway” which bursts through a Focus – but it feels like this should only be used sparingly as doing it too often or unnecessarily could easily cause annoyance or offence.

Time Sensitive notifications
Things can even be taken a stage further, in a potentially confusing way. There’s an additional setting called “time sensitive” where any app not on the allowed list is still allowed to send notifications marked as ‘time sensitive’, such as an appointment in your calendar. But, as the image below shows, when the first one of these comes through, you are offered control over whether you actually want these or not.

Focus and journalists
Where it can get really useful for journalists and others is the fact that with a Focus turned on, entire pages of apps can be temporarily hidden.
This means that if your iPhone is organised enough to have all personal or non-work apps on one screen and work ones on another, you can set up a Focus so that all the tempting personal apps just simply aren’t available to you on your device, leaving you to…focus on the work-related task in hand with the apps you do need access to.
But all is not lost – if temptation is too much to resist, all your apps are still accessible via the App Library.
There’s also a way that a Focus could provide a level of security for journalists caught in a tricky situation – although it’ll need a bit of forward planning and I can’t promise it’ll be 100% certain to keep you safe.
The scenario would be that you’re reporting from a location where police officers might be keen to have a look at your device. You could have a Focus called something bland like ‘DayTime’ and set it up such that when active, the screen on your iPhone which has all your reporting and communication apps, as well as your email and Photos, isn’t visible and instead your device only shows less problematic ones.
When you see someone in a uniform and gun approaching, quickly activate DayTime and they’ll only initially see the innocuous apps. If someone with a bit more knowledge spends more time looking through your device, the truth may soon become apparent especially as all your apps remain a swipe away in the App Library, so please don’t seek retribution on me once you’re eventually released from a tiny prison cell.
A Focus can also be triggered automatically based on location, with your device suggesting what it thinks is the most appropriate. This one was flagged up to me when my iPhone detected I’d come home after being out:

For power-user journalists, you can even trigger a Focus when you open an app.
I’ve set my iPhone up to do this. Combined with a personal automation, which triggers things like putting it into Airplane Mode and increasing the screen brightness to 100%, this means that I only need to open FilmicPro and I can use the app to gather content knowing I shouldn’t get any interruptions.
Other options for triggering a Focus are ‘at a certain time’, so if you have regular planning meetings each morning for an hour from 0800, the particular Focus will automatically come on at that time for that long; or ‘at a location’ so it’ll be triggered when you arrive at work before deactivating once you leave.
If all of this seems too much, then just carry on using Do Not Disturb as before.
Notifications
Related to Focus are Notifications and these get tweaked too, with changes to how they look and also a new option of having them all delivered en masse at 8am and 6pm or other times to suit you. While I can see that some users may benefit from only seeing notifications at a particular time, it feels that news journalists in particular may need to know them a bit sooner than that.
Hide My Email
Each iOS release contains very technical bug fixes and security updates which take place in the background and over which you have no control. But others are more openly available to users and iOS 15 has its fair share of these.
Giving out your email address to all and sundry, or using it when you sign up for apps or websites, may be something you’re totally fine with but it’d be understandable if many journalists would be less than comfortable doing this.
This is where ‘Hide My Email’ in iOS 15 could be useful although it’s important to point out that it’s not available to all, only to users who pay for iCloud storage, through a new service called iCloud+. If you’re still using the free, basic level of 5gb storage then you can’t use Hide My Email but if you pay you’re automatically upgraded.
For those who are on iCloud+, you’ll get offered the option to use a randomly-generated email address which then links directly to your own one.

The app or retailer never gets to see who you really are, yet you receive their emails and are able to use their services. You can also actively create your own unique email address by going to ‘Settings – Apple ID – iCloud – HideMyEmail’ on your iPhone.
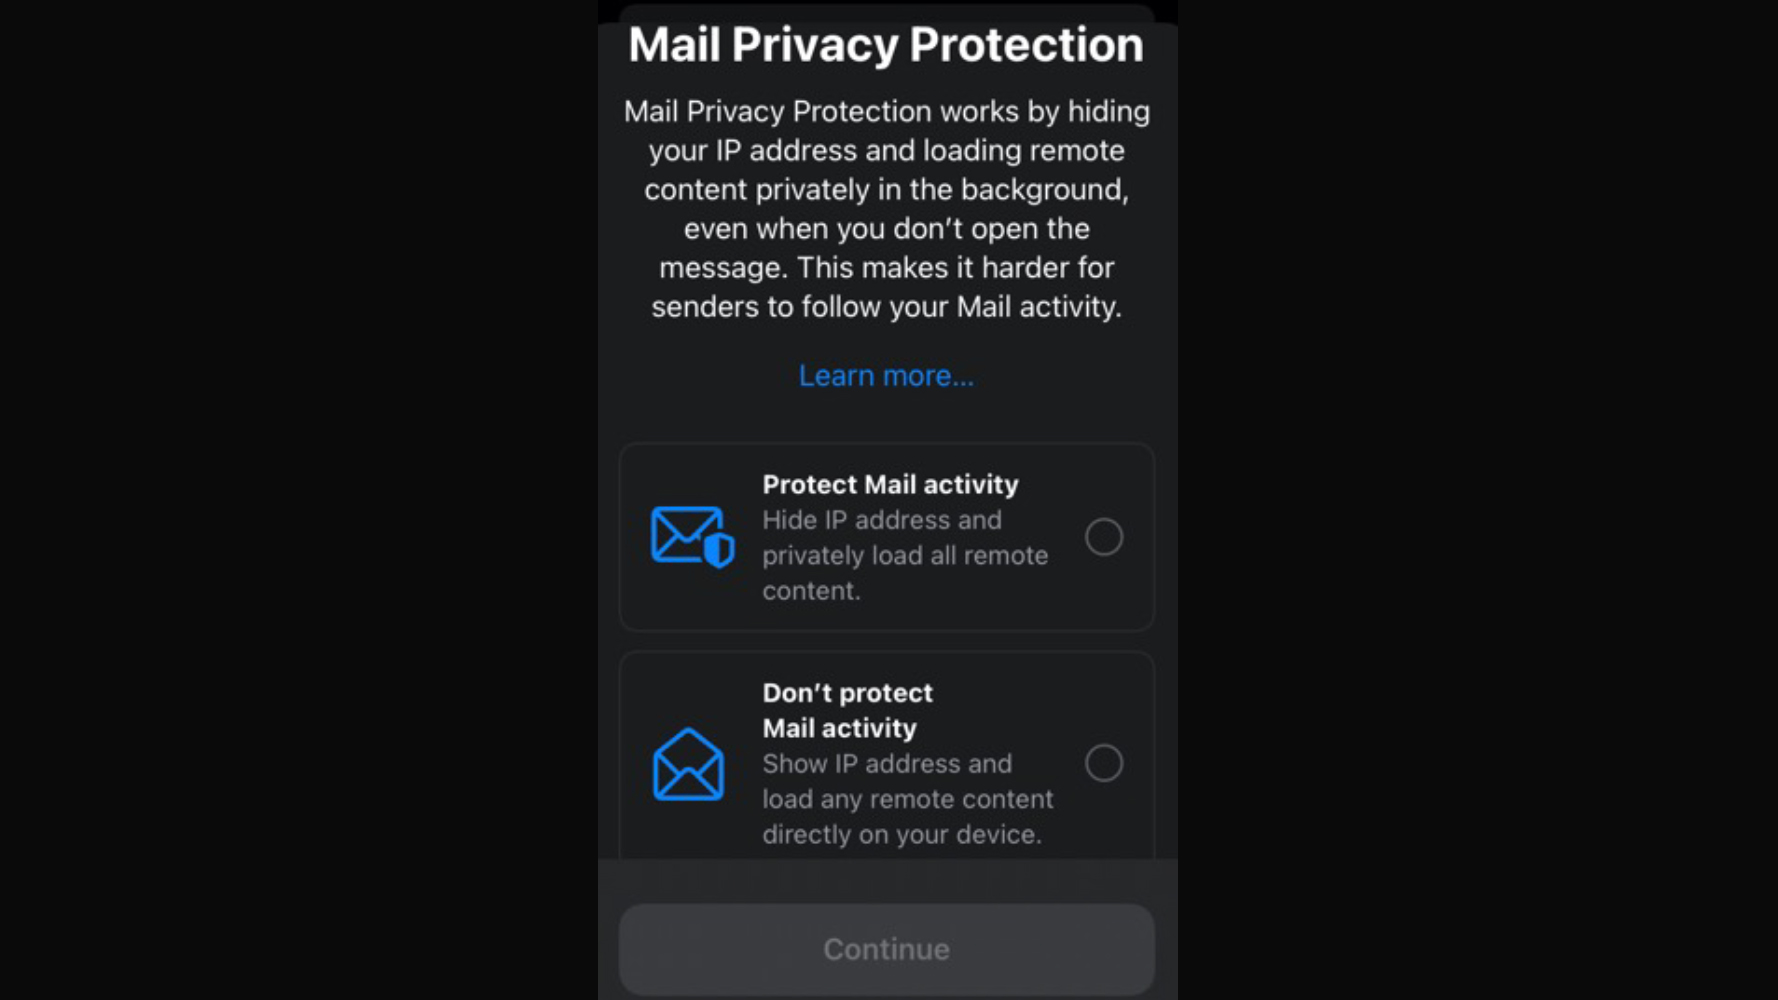
Staying with emails, but something which applies to all users not just those with iCloud+ is ‘Mail Privacy Protection’.
When you first open the default email app after updating to iOS 15, you’ll see this screen:
Mail Privacy Protection
The intention here is to give users some privacy when it comes to how companies and advertisers track you when interact with their emails. Usually, tracking pixels and other identifiers are sent when you open the email with information about where you are, the time and IP address.
With Mail Privacy Protection activated, your IP address is hidden and all content is loaded privately in the background, giving you an extra layer of privacy.
Private Relay
Back to a feature only available to those with iCloud+ but one which journalists may benefit from using called Private Relay. It’s available in iOS 15 even though it is still described by Apple as being in “beta”.
Private Relay is like a Virtual Private Network (a VPN), in that it obscures your IP address so you’re able to browse sites which might otherwise be inaccessible to you for example ones restricted by geography or content. You can choose to increase your anonymity by setting it to use the country and time zone you’re in, or have it maintain your general location so you can still see things which are local like restaurants and shops.
Private Relay isn’t quite as powerful as a VPN though, so don’t plan on using it to watch NetflixUS. Instead, it encrypts your browsing on sites without that little padlock on the URL bar, as well as hiding your real IP address.
This means that the site you’re looking at won’t know it’s you and nor will Apple. It works like this: your traffic is sent to an Apple server and then the IP address, which can be used to locate you, is removed. Your request for a website is then sent to another server where it’s given a temporary IP address before going on to the website you’ve requested. This should mean websites can’t build up a profile about your browsing history and therefore build a profile of you more generally. There are more secure ways of doing all this and so if you do really need proper protection and anonymity, then I wouldn’t rely on Private Relay. Being in beta, it isn’t totally reliable which isn’t ideal given what it is trying to do. I’ve found that Private Relay doesn’t work at all on my home wifi and only functions on 4G.
Record App Activity
iOS 14 brought a change whereby a small green light would be visible when an app was using your camera and an orange one when your mic was being used. iOS 15 goes further, with a new tool which will show which apps and sites are accessing a much wide range of features and data.
It’s somewhat buried, but you can find it in ‘Settings-Privacy-Record App Activity’ and then it needs to be turned on.
After a week of logging, you’ll be able to access a summary of when your apps did what, as well as what those apps did with your data and the sites they subsequently contacted. This though is another feature which was showcased when iOS 15 was unveiled and which has yet to make it into the hands of users.
Finally, a few changes which don’t fall easily into a particular category.
Longer Siri
If you’re the kind of journalist who likes to dictate your copy or script, then iOS 15 has removed the limit of how long Siri will listen to you before cutting out. It was capped at 60 seconds but now can keep going well beyond that. Tests I did showed Siri was fine at three minutes, although talking at speed did continue to be a challenge for it. It’s possible that this function could work as an automatic transcription service – open a note, turn on Siri and let it transcribe a speech or a press conference. I think it would be wise to also have a recording running at the same time, in case the transcription fails for some reason and also to give you the option to check it for accuracy.
Find My iPhone
Having a fully charged device is a pre-requisite for any journalist but if you’re the type who occasionally lets theirs run fully down and then mislays it, there’s renewed hope for you – as long as you have an iPhone 11 or newer (although not an SE 2020).
With iOS 15, you can still trace your device even when it’s out of power as ‘out of power’ seems to mean something slightly different as your device remains in a very low-power state. This means any nearby iOS device can see the Bluetooth signal it emits and send back its location to help you find it.
Notify When Left Behind
Some people are fortunate enough to have more than one iPhone and if they’re careless enough to forget to take one with them, a new alert will flag that up on their other devices. Called ‘Notify When Left Behind’, it’ll push a notification to the device you have remembered to take with you, as long as it’s on the same Apple ID and you’ve set the service up within the Find My app.

If and when you get this alert, go to ‘Settings-Apple ID-Find My’ and then into ‘Find My iPhone’ and then ensure all three lights are on as this ensures the new feature is active. Remember though, you can’t do this after the fact so it might even be advisable to turn this setting on right now.
At-a-glance information
One frustration of iOS 14 for me was that when my device was in Do Not Disturb, iPhones with a notch like the X or 11 wouldn’t show the tell-tale crescent moon on the main screen. This meant I had no immediate visual confirmation of the status of my device. On devices without a notch, there was space for the moon.
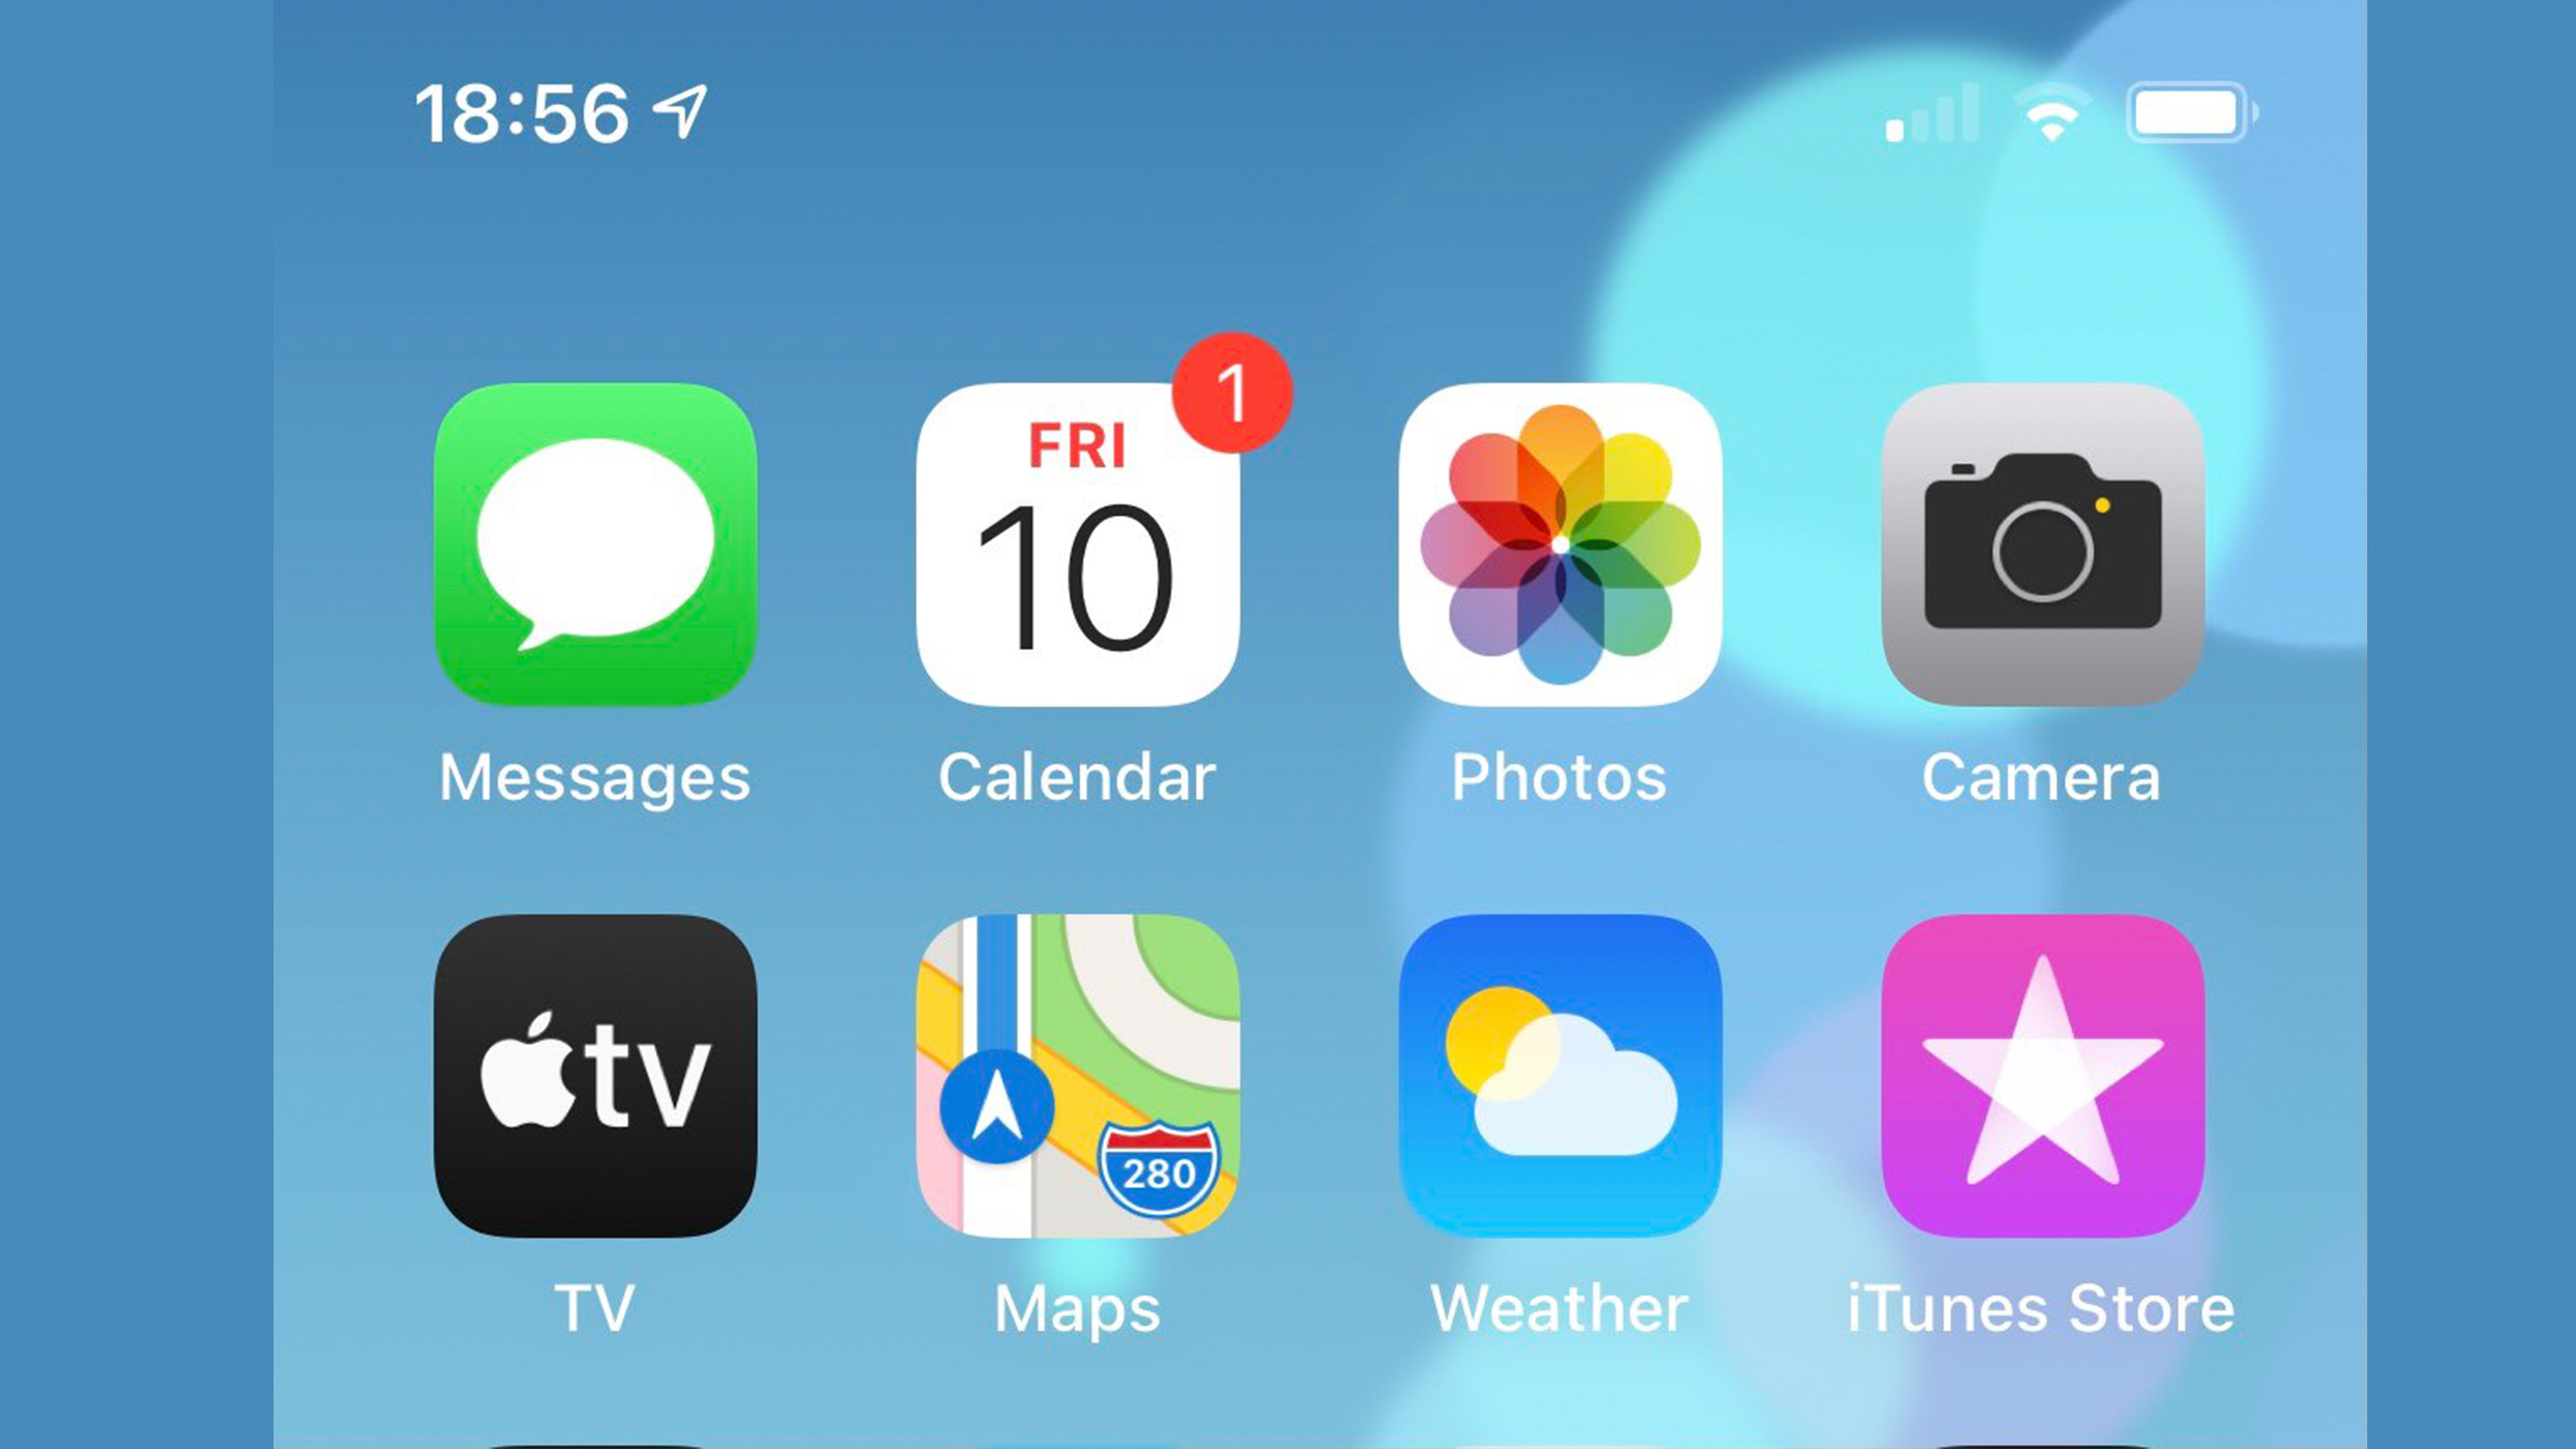
But in iOS 15, the icon is visible whichever Focus you’re in and I think that’s a useful improvement.

Bigger text where you want it
If you wanted larger text on previous versions of iOS, you either had to enable the feature for EVERYTHING on your device, or not at all whereas iOS 15 lets you do it per app.
Go to Control Centre in Settings and enable the “text size” option. Now, when you’re in an app where you need to adjust the size, slide to open the Control Centre panel and then press and hold on the aA icon.
In the bottom left it’ll give the name of the app currently open under Control Centre, as well as showing a slider to increase or decrease the font size.
Conclusion
These are the useful and interesting changes I’ve found from beta testing iOS 15 over the last few months. You might find others you like (or dislike) based on how you yourself use your device after you’ve upgraded. Or you may feel, having read this, that you’re happy with what iOS 14 can do and you’ll be fine only taking the bug fixes offered by Apple. For the first time ever, that choice is open to you.

Your articles are really helpful to me for understating Apple’s latest updates. Thanks for these valuable articles.
0 Pingbacks